How to make origami geometric shapes. Download and print geometric paper shapes coloring pages for free. How to make a gift bag
Rectangle, square, triangle, trapezoid and others are geometric figures from the section of exact science. A pyramid is a polyhedron. The base of this figure is a polygon, and the side faces are triangles with a common vertex, or trapezoids. To fully represent and study any geometric object, mock-ups are made. They use a wide variety of materials from which the pyramid is made. The surface of a polyhedral figure, unfolded on a plane, is called its development. The method of converting flat objects into three-dimensional polyhedra and certain knowledge of geometry will help you create a layout. It is not easy to make developments from paper or cardboard. You will need the ability to make drawings to specified dimensions.
Materials and accessories
Modeling and execution of multifaceted volumetric geometric shapes is an interesting and exciting process. You can make a large number of different layouts from paper. To work you will need:
- paper or cardboard;
- scissors;
- pencil;
- ruler;
- compass;
- eraser;
- glue.
Defining parameters
First of all, let's determine what the pyramid will be like. The development of this figure is the basis for making a three-dimensional figure. Completing the work will require extreme precision. If the drawing is incorrect, it will be impossible to assemble a geometric figure. Let's say you need to make a layout of the correct
Any geometric body has certain properties. This figure has a base and its vertex is projected into its center. The base is selected. This condition determines the name. The side edges of the pyramid are triangles, the number of which depends on the polyhedron chosen for the base. In this case there will be three of them. It is also important to know the dimensions of all the components that will make up the pyramid. Paper developments are made in accordance with all the data of the geometric figure. The parameters of the future model are agreed upon in advance. The choice of material used depends on these data.
How is a regular pyramid unfolded?
The basis of the model is a sheet of paper or cardboard. Work begins with a drawing of the pyramid. The figure is presented in expanded form. A flat image on paper corresponds to pre-selected dimensions and parameters. has a regular polygon as its base and its altitude passes through its center. Let's start by making a simple model. In this case, it is a triangular pyramid. Determine the dimensions of the selected figure.

To construct a development of a pyramid, the base of which is a regular triangle, in the center of the sheet, using a ruler and pencil, draw a base of the given dimensions. Next, to each side we draw the side faces of the pyramid - triangles. Now let's move on to their construction. We measure the dimensions of the sides of the triangles on the lateral surface with a compass. We place the leg of the compass at the top of the drawn base and make a notch. We repeat the action, moving to the next point of the triangle. The intersection obtained as a result of such actions will determine the vertices of the side faces of the pyramid. We connect them to the base. We get a drawing of a pyramid. To glue a three-dimensional figure, valves are provided on the sides of the side faces. We finish drawing small trapezoids.
Layout assembly
Using scissors, cut out the completed design along the contour. Carefully bend the development along all the lines. We tuck the trapezoid valves inside the figure so that its edges close together. We lubricate them with glue. After thirty minutes the glue will dry. The volumetric figure is ready.
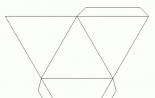
First, let's imagine what the geometric figure looks like, the model of which we will make. The base of the selected pyramid is a quadrangle. The side ribs are triangles. For work we use the same materials and devices as in the previous version. We draw the drawing on paper with a pencil. In the center of the sheet we draw a quadrilateral with the selected parameters.

We divide each side of the base in half. We draw a perpendicular, which will be the height of the triangular face. Using a compass solution equal to the length of the side face of the pyramid, we make notches on the perpendiculars, placing its leg at the top of the base. We connect both corners of one side of the base to the resulting point on the perpendicular. As a result, we get a square in the center of the drawing, on the edges of which triangles are drawn. To fix the model on the side faces, add auxiliary valves. For reliable fastening, a strip of centimeter width is enough. The pyramid is ready for assembly.
The final stage of the layout
We cut out the resulting pattern of the figure along the contour. We bend the paper along the drawn lines. The three-dimensional figure is assembled by gluing. Lubricate the provided valves with glue and fix the resulting model.

Volumetric layouts of complex figures
After completing a simple polyhedron model, you can move on to more complex geometric shapes. Unfolding a truncated pyramid is much more difficult to perform. Its bases are similar polyhedra. The side faces are trapezoids. The sequence of work will be the same as that in which a simple pyramid was made. The sweep will be more cumbersome. To complete the drawing, use a pencil, compass and ruler.
Construction of a drawing
The development of a truncated pyramid is performed in several stages. The side face of a truncated pyramid is a trapezoid, and the bases are similar polyhedra. Let's say these are squares. On a sheet of paper we draw a trapezoid with the given dimensions. We extend the sides of the resulting figure until they intersect. The result is an isosceles triangle. We measure its side with a compass. On a separate sheet of paper we draw which will be the measured distance.

The next stage is the construction of the side ribs that the truncated pyramid has. The sweep is performed inside the drawn circle. Using a compass, measure the lower base of the trapezoid. On the circle we mark five points that connect the lines to its center. We get four isosceles triangles. Using a compass, measure the side of the trapezoid drawn on a separate sheet. We put this distance on each side of the drawn triangles. We connect the resulting points. The side faces of the trapezoid are ready. All that remains is to draw the upper and lower bases of the pyramid. In this case, these are similar polyhedra - squares. We add squares to the upper and lower bases of the first trapezoid. The drawing shows all the parts that the pyramid has. The scan is almost ready. All that remains is to finish drawing the connecting valves on the sides of the smaller square and one of the faces of the trapezoids.
Completing the Simulation
Before gluing the three-dimensional figure, the drawing along the contour is cut out with scissors. Next, the development is carefully bent along the drawn lines. We tuck the mounting valves inside the model. We lubricate them with glue and press them to the edges of the pyramid. Let the models dry.

Making different models of polyhedra
Making three-dimensional models of geometric shapes is a fascinating activity. To master it thoroughly, you should start by performing the simplest sweeps. Gradually moving from simple crafts to more complex models, you can begin to create the most intricate designs.
You like origami. You are delighted with beautiful paper figures, but you think that it is extremely difficult. Believe me, there is no need to engage in self-deception. In ancient times, monks figured out how to make special figures out of paper, which were intended to decorate temples and conduct religious ceremonies. This is not as difficult as it seems at first glance, and today we will try to prove it to you.
Materials for work
First, we will need to purchase a set of tools for our future work. The first thing you need to pay attention to is the choice of paper. An office one is best because it is quite rigid. It is quite enough for any folding schemes. To connect small parts you will need paper glue, for example PVA or a special glue stick. If you need to connect several blanks of different colors, aerosol glue will come to the rescue; when you use it, you can create unique multi-colored figures.
You can also use other specialized glue masses, especially those that do not leave any marks on the paper or are quite easily removed. At the same time, it is convenient to attach with such glue both outside the product and inside. If the figurine is made of white or gray paper, then you can use spray paint to give the craft the required color. Several types of scissors may be required. Sometimes a cutter comes in handy. This tool aligns the cuts. Be very careful, the blade can be very sharp, otherwise you won’t get a smooth and beautiful cut.
Buy several different lines. They will be useful for making a diagram of the craft, tracking the desired angle during assembly, applying the main part and correctly placing the product on the basis of the panel. Regular pencils or a special pencil will be useful. Experienced origami makers use rhinestones, various ribbons, pieces of fabric, unnecessary beads, beads from other decorations, and much more in their work. All this is suitable for creating unique and original figures.
The right approach to choosing paper
To get results, you should approach the choice of paper with full responsibility. After all, the creation of figures mainly involves bending and folding paper sheets. A lot, if not everything, depends on its quality. The list below will allow you to understand which material is best suited for origami, and which is not suitable at all:
- Office paper is quite thick, stiff and quite cheap. The first steps when creating figures should be taken with the help of it. When joining, a piece of paper holds very well, and if the workpiece is damaged, there is absolutely no shame in throwing it away.
- Multi-colored office paper - has the same advantages as plain office paper and does not have stains or white stripes on the folds, great for modular origami.
- Stickers - great for colorful figures, most often used in modular origami and kusudami.
- Colored paper for school is 100% not suitable for this hobby. Thin, not dense, tears easily enough, light stripes remain at the folds.
- Foil paper is very thick, almost impossible to tear, and is more often used for making complex circuits and models. If you straighten the fold, hard, dense stripes will remain.
- The pages of glossy magazines retain their shape and fold perfectly, and are quite dense.
- Banknotes have good strength and perform well on folds. Perfect for creating small exclusive gifts.
- Paper intended for origami has several types (double-sided, monotone, etc.), and is found in the form of sets.
- Tracing paper - suitable for those who are taking their first steps and decided to test their strength.
- Different variations of expensive paper have both advantages and disadvantages and are used only for certain products.

What types of origami are there?
There are several types of origami that help you have a great time, learn how to create jewelry with your own hands, improving your skills and abilities over time. In addition to the well-known origami techniques of the so-called classical direction, there are several alternative ones:
- Regular (simple) origami - suitable for those who decided to try themselves in a new business. Assembling the figures does not require special skills; the folds need to be made towards you with the so-called valley or away from you with the mountain. A good example is the figurine of a crane.
- Modular origami (blanks made from modules). The connection is made from several identical parts, called modules, which are folded according to the laws of ordinary origami from a single sheet. They are connected by simple folding. Do not crumble due to friction between individual modules.
- Aerogami is a name that speaks for itself. The art of creating airplane figures.
- Kusudami is origami using volume; modules are assembled using glue or thread. Most often, crafts are made in the shape of a ball.
- Kirigami - making various figures using scissors. Suitable for making holiday cards.
- Raw or wet origami. The base is paper moistened with water to give the products a more expressive shape, hardness and clear lines. More often found in the manufacture of figurines of animals and unusual plants. The paper must contain water-soluble glue, otherwise the product will inevitably fall apart.

Crane - origami
One of the simplest models, it is believed that if you collect 1000 cranes, your most cherished wish will come true.
Step-by-step instructions for making an origami crane look like this:
- Bend the paper sheet diagonally.
- We take scissors and cut off all the excess, in the end there should be a triangle left.
- Let's make one more fold.
- From the resulting triangle (one, since there will be 2 of them), we make a square using the straightening method. On the other hand, we repeat the procedure.
- Take the edges from above and gently bend them towards the center.
- Bend the triangle located on top.
- We unbend it, we form a contour.
- Bend the lowest corner horizontally.
- Fold the edges towards the center to form a diamond shape. We repeat all steps on the other side.
- Take it by the bottom and bend it along the inner counter. The result is a neck.
- We also make a tail.
- At the neck, carefully bend the beginning to obtain a beak.
- We bend the wings using a slight angle.
The crane is ready, you can color it if you wish.


Paper rose
One of the most popular models is the origami rose. It's quite simple to do:
- Fold a sheet in half, preferably red. Let's make one more fold.
- We open the top layer and flatten the top a little.
- Turn it to the other side and flip it over.
- We repeat the second step.
- Take both corners and bend them towards the top corner.
- We bend the resulting triangle in half until we get fold lines.
- Pull the corners down, flattening them a little, and open the triangles.
- We take the pockets by the upper part and very carefully bend them down.
- On the other side, repeat steps 5-8.
- Bend the top corner.
- Open the bottom part like a notebook.
- Stretch and flatten until you get two triangles.
- Place the workpiece on the other side.
- Raise the triangle to the top.
- The lower square located to the right bends strictly diagonally from top to bottom.
- Rotate the workpiece 180 degrees and repeat the previous step.
- We transfer the product to the left hand, carefully take the walls of the product with the fingers of the other hand and twist it clockwise until we get a rose. We bend the petals with a handle.


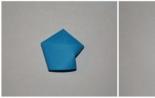
Volumetric origami - flower ball
Making a beautiful origami in the form of a flower ball is very simple, the main thing is to be patient and follow the instructions:
- Fold the note paper in half in the shape of a triangle.
- We bend the edges and press them very firmly.
- Bend the right corner back.
- Bend the left side of the triangle, folding it in half.
- We do the same with the right one.
- Then we fold the entire workpiece in half.
- We bend the triangle below in half again.
- In this case, the larger figure should be on top of the smaller one.
- We fold part of the protruding triangle and bend it inward.
- One module is ready, we do the same with 4 more sheets. They should all be completely identical.
- We glue the modules together or put them on tape.
- The first flower is ready, we do the rest in exactly the same way.
- You will need approximately 11 of these flowers, connect them together with glue until you get a ball.


Origami in the shape of an Easter egg
To create an egg you need to make about 1000 modules. They will be attached using grooves. Colors and patterns are limited by your imagination. Assembly starts from the top, take 8 modules of the same color and make a circle out of them, add another module between the rows. It turns out two rows of 8 modules. In the next row, two blanks are added between the rows. To increase the volume, it is necessary to add modules in each subsequent row. There should be 32 modules in the middle. The bottom is assembled in exactly the same way, but the number of modules will be reduced.
Once the egg is ready, you can begin making the stand. We take 18 modules and form a circle from them. Modules are inserted into unoccupied spaces in the row. We come up with a pattern by selecting blanks by color. The parts for the central axis of the stand consist of two rows of 12 pieces. To start row number 3, you need to move the modules towards the center, turning them slightly inside out. We lay the finished parts up. We have formed a column. In the middle of the stand there will be 7 rows of modules. The top is assembled in the same way as the bottom.


Modular origami in the form of a white swan
Step-by-step instructions for creating modular origami in the form of a beautiful three-dimensional swan:
- We make 458 blanks from plain paper in the form of a triangle. For the beak we make one red one.
- We insert two modules with their corners into the pocket of the third.
- Add 2 more. We fasten the corners into pockets.
- We prepare 3 rows in the same way, for each you will need 30 blanks, close the circle.
- We also put on modules for 4 and 5 circles.
- Hold the product with your fingers and press on the center, gradually turning it inside out.
- We bend the edges of our future swan up.
- We make the 6th row, observing the checkerboard order of the pieces.
- We are preparing blanks for the wings in the seventh row, for which we put on twelve modules, skipping 2 corners and attaching 12 more. The narrow place left will be the neck, and the widened one will be the tail.
- In the eighth row, we reduce the number of modules in the krill by one.
- Next, we do the same with each row until one triangle remains.
- The tail is made by reducing it by a module in each row.
- The head and neck are assembled from 10 regular and one colored blank, red or yellow. The corners of the colored blank must be glued together so that the beak does not split in two. We assemble the neck by inserting the corners into the pockets of the blanks, then gradually bending them.
- We put the neck in place.
The swan is ready.


Anyone can learn origami in full, you just need to have a little free time and desire and you will succeed.
99 new photo ideas for paper origami


Have you noticed how interested children are from a young age? paper figures? Maybe it's the natural desire of all of us to see the whole world in a combination of simple geometric shapes. And it is all the more interesting to see circles, ovals, squares or triangles in every object that surrounds us. And a child can get acquainted with three-dimensional figures long before a school geometry course in a fun, playful way.
Geometric shapes made of paper
In every book on early development, along with colors, letters and numbers, the first step is to study basic geometric shapes. After all, this is how a child learns to understand what the form of things is, what it is and how it can be characterized. In a playful way, with the help of educational videos, poems, examples from surrounding things, the child learns to distinguish between a square and a triangle, a circle and a rhombus. Having studied the pictures in the book, the child can remember the names of the figures, but the further task is to consolidate this information in a playful way. They will come to our aid here geometric shapes made of paper.
We will collect from various figures. She will demonstrate to the child in the best possible way that any drawing can be created if simple familiar geometric shapes are arranged in the correct sequence. Here is an application with the image of a clown. For this you will need to first cut out the basic shapes from colored paper. These will be multi-colored circles, an oval, a triangle, a star, semicircles. You can stick them on double-sided tape if the base is cardboard with a smooth surface. Or you can use a glue stick, which is very easy to use.

Another simple example of geometric appliqué is a landscape. On it you can depict a square house with a triangular roof, trees with a round and triangular (Christmas tree) crown, and a round sun. Having completed these on their own, the child will be able to better understand how to draw the same landscape with a pencil, that for a house you need to draw a square with a triangle on top, and also provide the home with a square window and a rectangular door.

You can make some kind of symbiosis between and geometric applique by making such a smart train. Cut a blank from a sheet of standard-sized paper by first folding the sheet in half. Next, invite your child to stick geometric shapes from colored paper on their respective places: a yellow semicircle will become the nose of the train, small circles will become wheels, and blue rectangles will become windows in which you can even draw traveling passengers.
Volumetric paper figures
Don't be afraid to introduce your child to three-dimensional paper figures It will be early, and he may not understand something. On the contrary, it is a little like the magic that parents can make with their own hands, when a three-dimensional toy suddenly appears from a flat sheet of paper. These can become both a teaching item and, for example, part of any design.
Explain to your child that every flat figure has a relative, a three-dimensional figure, which may have a different name, but always contains the outlines of a flat geometric figure. The easiest way is probably to start with a cube, because educational cubes for kids are a classic toy. At first, you can simply draw the child’s attention to the fact that each face of the cube has a square shape, after which you can begin to get acquainted with the layout drawing.
This word is complex, however, the child will be able to understand how the cube is ultimately assembled, to see that there are four squares depicted on flat paper, exactly as many as are needed for the finished cube. Over time, already in school, it will be easier for him to do calculations. square figures on checkered paper, because he will receive this knowledge at a young age. To begin with, you can draw the layout on notebook sheets in a box, then move on to denser material. You can also buy ready-made layouts in the store for almost all geometric shapes, for example, cubes with ready-made letters and designs on each surface.

You can fold this two-color paper cube with your child if you are into paper crafts such as origami. Fold a square sheet of paper in half, and then in half again to make four parts. Then, following the instructions, bend the edges of the figure so that you end up with a piece with two full surfaces and two sharp corners. All you have to do is make a second blank of the same type and combine it with the first, placing the sharp corners in paper pockets.
How to make paper shapes
Naturally, we won’t stop only at the cube, because there are still so many interesting crafts ahead. Let's find out how to make paper shapes different form.

Each such figure has its own name and it will be easier to remember it if you pick up any associations with this object from your child. Now, there’s no need to invent anything for the cube, the baby already knows the name of his favorite children’s toy very well. Of course, we don’t have to mention the parallelepiped for now (especially for “advanced” children), but it’s easy to think of what a cylinder or a pyramid can be associated with.

If you decide to make a cylinder with your child, ask him what object it resembles. Maybe it's a glass, or maybe a drainpipe. Tell us about the funny top hats that wizards or magicians wear in the circus. You can try to make such a hat together. To do this, you will need to take whatman paper, and the denser it is, the stronger your cylinder will ultimately be. On this sheet we draw a long rectangle, the width of which will be equal to the future height of your cylinder. We retreat a few centimeters from the smaller edge of the rectangle and draw a circle that will touch the rectangle at its top point. We cut out this shape carefully so as not to cut the circle from the rectangle. Now, we begin to wrap the rectangle into a tube, and the circle covers this tube like a lid. Using tape, secure the circle and the edge of the rectangle. Now we cut out another circle, but of a larger diameter, cut a hole inside it, and glue this circle to the cylinder. All that remains is to cover our craft with colored paper and decorate it with applique.

Our generation may associate the cone with a bag for seeds, but for our children we need to look for other associations. Based on the cone, Christmas trees are made for New Year's topiaries, and you can also make funny shapes, for example. To do this, you need to use a compass to draw a circle on a sheet of thick paper and visually divide it into three parts. On one third in the upper corner in the center we draw the face of the future snowman, eyes, nose and mouth. Cut out this third of the circle. We spread a thin strip of glue on one of the edges, bend the cone and glue the two edges together. We roll up a small cylinder from colorful wrapping paper (now we already know how to do this) and secure it on top of the cone. We twist the black corrugated paper into ropes, rolling the paper between our palms. We glue mittens made of colored paper to these strands, cut out and glue a scarf from the same paper. We strengthen the ability to twist a cone by making it from a piece of orange paper - this will be a carrot nose, which any self-respecting snowman cannot do without.
Make a geometric shape out of paper
Offer to practice again make a geometric shape out of paper, this time - a pyramid. It can also be created using origami patterns, but we can take another, simpler route by fastening the finished figure with glue.

The layout for the pyramid is a four-pointed star. Since it won’t be easy to draw it correctly on regular white paper, you can draw figures on checkered paper, and then transfer it to the sheet as from the template. So, draw a square in the center of the sheet. From each side we draw an isosceles triangle, providing one of its sides with an additional small strip for gluing. Cut out the finished star from paper and apply it to a sheet of thick and colored paper (you can also use thin cardboard). We bend all the lines between the square and the triangles well, spread the gluing strips with glue and bring all the faces of the pyramid to one point. It's time to play, after all. On the layout planes we draw images of animals and after gluing we get new pyramid toys: a fish, a cat, a dog, a bird. In addition to the patterns on the pyramids themselves, you can add additional elements to the paper figures.
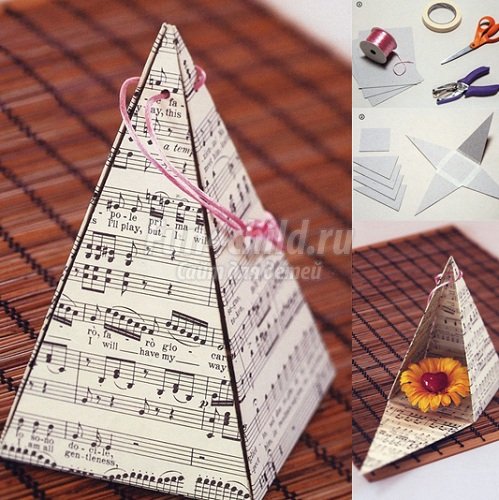
Pyramids also make great homemade gift wrapping. The more beautiful the source material - cardboard - is, the more beautiful the packaging will be in the end. You can use cardboard from boxes with a beautiful pattern for this purpose. You can see how to make a fastening on a pyramid using a rope in the presented photo. On all planes we make small holes the size of the fastening cord. We pull it through all the holes, like a lace, and tie the ends with a bow. In order to get the contents of such a package, you just need to untie the ends of the lace and pull it out of one hole.
Volumetric geometric shapes
Volumetric geometric shapes can be quite complex. Once you have mastered the basics, you can move on to them.

For example, try making an icosahedron - a polyhedron consisting of twenty faces, each of which is a triangle with equal sides. For such geometric paper figures diagrams require special care, because even a small error in the parallelism of the lines will make the finished figure crooked. You can also fold half of the icosahedron and make an original gift box out of it.

It will not be difficult to make an unusual three-dimensional figure - a torus, if in your work you use a special assembly diagram, which you can download on the Internet. It consists of many ovals of different sizes, on which many cuts need to be made. The ovals are cut out of thick paper, then they begin to be connected to each other using a system of cuts. As a result, you should end up with a three-dimensional donut, the geometric name of which is torus.
After such fun activities, no geometry will be too difficult for your child in the future process of schooling.
Key news tags:
Other news
The most complex and unusual forms of structures, devices, and mechanisms are based on elementary geometric figures: cube, prism, pyramid, ball and others. To begin with, learn how to create the simplest shapes, and then you can easily master more complex shapes.
Many modelers start their journey with paper models. This is due to the availability of the material (finding paper and cardboard is not difficult) and the ease of processing it (no special tools are required).
However, paper also has a number of characteristic features:
- capricious, fragile material
- requires high accuracy, attentiveness, and perseverance when working
For these reasons, paper is a material for both beginners and true masters, and models of varying complexity are created from it.
In this article we will study the simplest geometric shapes that can be made from paper.
You will need the following materials:
- paper
- pencil
- ruler
- eraser
- scissors
- PVA glue or glue stick
- glue brush, preferably with stiff bristles
- compass (for some figures)
How to make a cube out of paper?
A cube is a regular polyhedron, each face of which is a square.
Creating a cube consists of two stages: creating a flat pattern and gluing. figures. To create a diagram, you can use a printer by simply printing out the finished diagram. Or you can draw the development yourself using drawing tools.
Drawing a sweep:
- We choose the dimensions of the square - one side of our cube. The piece of paper should be at least 3 sides wide of this square and slightly more than 4 sides long.
- We draw four squares along the length of our sheet, which will become the sides of the cube. We draw them strictly on the same line, close to each other.
- Above and below any of the squares we draw one of the same squares.
- We finish drawing the gluing strips, with the help of which the edges will be connected to each other. Every two edges should be connected by one strip.
- The cube is ready!

After drawing, the development is cut out with scissors and glued with PVA. Spread a very thin layer of glue evenly with a brush over the gluing surface. We connect the surfaces and fix them in the desired position for a while, using a paper clip or a small weight. The glue takes about 30-40 minutes to set. You can speed up drying by heating, for example, on a radiator. Afterwards we glue the following edges and fix them in the desired position. And so on. This way you will gradually glue all the faces of the cube. Use small amounts of glue!
How to make a cone out of paper?
A cone is a body obtained by combining all rays emanating from one point (the vertex of the cone) and passing through a flat surface.
Drawing a sweep:
- Drawing a circle with a compass
- We cut out a sector (a part of a circle bounded by an arc of a circle and two radii drawn to the ends of this arc) from this circle. The larger the sector you cut, the sharper the end of the cone will be.
- Glue the side surface of the cone.
- We measure the diameter of the base of the cone. Using a compass, draw a circle on a sheet of paper of the required diameter. We add triangles to glue the base to the side surface. Cut it out.
- Glue the base to the side surface.
- The cone is ready!

How to make a cylinder out of paper?
A cylinder is a geometric body bounded by a cylindrical surface and two parallel planes intersecting it.
Drawing a sweep:
- We draw a rectangle on paper, in which the width is the height of the cylinder, and the length determines the diameter of the future figure. The ratio of the length of the rectangle to the diameter is determined by the expression: L=πD, where L is the length of the rectangle, and D is the diameter of the future cylinder. Substituting the required diameter into the formula, we will find the length of the rectangle that we will draw on paper. We finish drawing small additional triangles that are necessary for gluing the parts.
- Draw two circles on paper, the diameter of a cylinder. These will be the top and bottom bases of the cylinder.
- We cut out all the details of the future paper cylinder.
- Glue the side surface of the cylinder from a rectangle. Let the parts dry. Glue the bottom base. Waiting for it to dry. Glue the top base.
- The cylinder is ready!

How to make a parallelepiped from paper?
A parallelepiped is a polyhedron with six faces and each of them is a parallelogram.
Drawing a sweep:
- We select the dimensions of the parallelepiped and the angles.
- Draw a parallelogram - the base. On each side we draw the sides - parallelograms. From any side we draw the second base. Add strips for gluing. A parallelepiped can be rectangular if the sides are rectangles. If the parallelepiped is not rectangular, then creating a development is a little more difficult. For each parallelogram you need to maintain the required angles.
- We cut out the development and glue it together.
- The parallelepiped is ready!

How to make a pyramid out of paper?
A pyramid is a polyhedron, the base of which is a polygon, and the remaining faces are triangles having a common vertex.
Drawing a sweep:
- We select the dimensions of the pyramid and the number of its faces.
- We draw the base - a polyhedron. Depending on the number of faces, it can be a triangle, square, pentagon or other polyhedron.
- From one of the sides of the base we draw a triangle, which will be the side. We draw the next triangle so that one side is common with the previous one, and so on. So we draw as many triangles as there are sides in the pyramid. We finish drawing strips for gluing in the right places.
- Cut out and glue the shape.
- The pyramid is ready!

Creating crafts with your own hands is interesting not only for children, but also for adults. However, a sufficient number of models have been invented for adults, which differ in the complexity of execution and the time spent on their creation. Recently, adults and children have become interested in creating complex geometric shapes. This type of figure includes the icosahedron, which is a regular polygon and is one of the Platonic solids - regular polyhedra. This figure has 20 triangular faces (equilateral triangles), 30 edges and 12 vertices, which are the junction of 5 edges. Assembling a correct icosahedron from paper is quite difficult, but interesting. If you are passionate about origami, then making a paper icosahedron with your own hands will not be difficult for you. It is made from colored, corrugated paper, foil, and wrapping paper for flowers. Using a variety of materials, you can add even greater beauty and effectiveness to your icosahedron. Everything depends only on the imagination of its creator and the available material on the table.
 |
 |
 |
 |
 |
 |
We offer you several options for icosahedron developments, which can be printed, transferred to thick paper and cardboard, bent along the lines and glued.
How to make an icosahedron from paper: diagram
In order to assemble an icosahedron from a sheet of paper or cardboard, you must first prepare the following materials:
- icosahedron layout;
- PVA glue;
- scissors;
- ruler.


When creating an icosahedron, it is important to pay special attention to the process of bending all the parts: in order to bend the paper evenly, you can use a regular ruler.
It is noteworthy that the icosahedron can also be found in everyday life. For example, a soccer ball is made in the shape of a truncated icosahedron (a polyhedron consisting of 12 pentagons and 20 hexagons of regular shape). This is especially visible if you color the resulting icosahedron in black and white, like the ball itself.
You can make such a soccer ball yourself by first printing out a scan of a truncated icosahedron in 2 copies:

Creating an icosahedron with your own hands is an interesting process that requires thoughtfulness, patience and a lot of paper. However, the final result will please the eye for a long time. The icosahedron can be given to a child to play with if he has already reached the age of three. By playing with such a complex geometric figure, he will develop not only imaginative thinking and spatial skills, but also become acquainted with the world of geometry. If an adult decides to create an icosahedron on his own, then such a creative process of constructing an icosahedron will allow him to pass the time and also show off to his loved ones his ability to create complex shapes.