Braiding is simple and beautiful step by step. How to learn to braid your own hair? To create a hairstyle, you need
The times of workers' and peasants' short haircuts from propaganda posters are long gone. Since ancient times, long and well-groomed hair has been considered the beauty and pride of a woman, a sign of health and prosperity. Modern care products allow you to maintain shine and smoothness of your curls, but it is really important to be able to style long strands into a neat hairstyle. In recent years, various hairstyles with braids have become popular. Many girls want to learn how to braid their own hair.
Most of them are suitable for girls with long or medium-length hair. Spikelets, French and voluminous braids look impressive and give the owner a well-groomed and noble look. But visiting salons for daily hairstyles will require large financial and time expenditures. But what to do in this case? The answer is simple - learn to braid your hair yourself.
The Internet is full of photographs with a variety of hairstyles, consisting of complex braids, curls and numerous intricacies. But they require skill and considerable finger dexterity, and therefore it is worth starting with a simple regular braid. Ribbons, elastic bands, hairpins, a comb and a couple of mirrors, it will be very inconvenient to look for them during the process. All this is prepared in advance. Now you can sit between a pair of mirrors and start weaving.
Traditional braid - tourniquet
You can learn more about braiding long hair with a ribbon from this article:
Which wedding hairstyles with side bangs are the most popular and beautiful are indicated in this
For those who want to understand how African braids are made for short hair, you should look at the photo in this
The appearance of the braid will vary depending on the width of the strands you add and the thinness of the base braid. If done in advance, the image will be more romantic. Thin strands on a tight braid are part of a business style. Traditionally, the bangs are woven into the braid, but if they are too short, you can leave them loose.
Video of a traditional French braid:
Waterfall - how to splash around
Another braid that comes from the French braid. It got its name from the strands that come out of it, which if twisted a little will look like streams of water. Perfect for hair of different lengths, starting from bobs, looks especially good on highlighted hair.
The first three segments are performed as a traditional tourniquet. In the fourth segment, the top strand is placed on the middle one, passed down and covered with the one below. The first trickle of the waterfall is done. 
All that remains is to take a new strand at the bottom and insert it into the weave instead of the missing one, then add a curl to the top one. Weave yourself like this until the end. You can braid quickly from temple to temple, diagonally, turning into traditional plaits. The scope for imagination is enormous. It can be made more free and decorated with flowers, the result will be a very romantic and delicate image. Tighten loose curls with tweezers.
Volumetric or inverted braid - how to weave such a hairstyle
This braid for beginners seems challenging due to its lacy look and attractive volume. In fact, its weaving itself differs little from the usual ear of corn, only the strands are placed not on top of, but under each other. If the braid is planned to be voluminous, then straight hair can be twisted a little with curling irons in advance.

(an inverted French braid) must be done as follows: separate the front triangular strand from the mass of combed hair and divide it into three parts. Start weaving the first segment; to do this, pass the left strand under the central one. Then, moving the central one to the side and holding them, pass the right one under the left. Starting from the second segment, add strands. To do this, from the left temple, attach a small curl to the left strand and pass them under the central one, then repeat the same on the right side. Repeat until all the hair is braided and secure the braid with an elastic band.
Now all that remains is to add volume. To do this, strands are pulled very slowly and carefully from the middle of each segment. You must act carefully and evenly in order to get the same and beautiful result. If everything is done correctly, the result is a hairstyle worthy of parties and special occasions. It can be woven diagonally, in a circle, or positioned as you like, creating amazing images, even on short stripes, braiding bangs. But how to do it is described in detail in the contents of the article.
In the video, a French inverted braid:
Braid - headband for medium-length hair - how to braid it yourself
For a couple of years now, plastic headbands have not been in the top popularity for owners of voluminous hair. Hollywood stars appear with neat braids - headbands. It is woven on a voluminous base. It is enough to separate the curls along the hairline from ear to ear. For convenience, gather the rest of your hair into a ponytail. We weave from left to right, braiding thin strands from below, and upon completion, secure behind the ear. All that remains is to let your hair down. And for those who want to understand this in more detail, it is worth reading the contents of this article.

If desired, you can use regular weaving - a tourniquet. Separating part of the stripes at the ear, and the rest in the tail. Braid a regular braid, placing the side strands over the central one. Place it behind your ear and let your hair down.
These hairstyles can be complemented with flowers, curls and beautiful earrings.
Side braids - how to braid for beginners
Side braids are several types of braiding united by a common idea - the braid ends up lying on one shoulder, starting from the opposite side. There is one condition for braiding it - the hair must be of sufficient length to be woven on the side opposite to the braid.

Weaving a lush side plait for yourself
This is the simplest version of the side braid. We make a parting along the hairline on the side and select three strands, begin to weave a simple braid until the shortest hair begins to come out of the braid, and fix it with an elastic band.

To add volume, you can evenly pull out the strands; this should be done slowly and carefully.
How to quickly learn how to braid a four-strand braid
It is similar to a tourniquet, but in it the hair is divided not into 3, but into 4 parts. To braid, all the hair is combed and thrown to the side on which the braid will be. Now divide them into 4 even strands. Place the first curl over the first, and the fourth over the third.

The curls will move to the left, then the first curl will move on top of the fourth. Continue to the desired length and secure with an elastic band. This braid is convenient to use for hairstyles gathered on the head, decorated with flowers or hairpins.
How to do a beautiful French side braid on long hair
The idea of this braid is to create a braid that lies on one shoulder, starting from the opposite side. It can be started from the top of the head or closer to the other shoulder.

You need to select three equal strands and weave one section of the braid. Now you can. A lock of loose hair from the mass from the shoulder is added to each strand on the upper side. By the time the braid reaches the shoulder, all the hair should be braided. The rest can be woven into a bundle.
Video of a French side braid:
Which braid is most convenient for you to braid yourself?
Each girl decides which braid to choose for herself, but for most it is easier to start with a regular braid. When it turns out, you can proceed to the spikelet, side and volume braids. That's all. Now with a little training you can achieve any hairstyle. The good thing about braids is that they offer an endless variety of combinations and options; very soon you will be limited only by your imagination, but even here the Internet will come to the rescue with a huge number of different master classes.
The simplest braiding can be mastered not only by women, but also by men who have to get their daughters ready for kindergarten or school. The simplest braids are three-strand braids. Weaving four-strand braids is more difficult, but it is worth it - such hairstyles look very unusual. What can we say about all sorts of other modifications - French braids, dragons, plaits, daisies and other methods! Having mastered these simple and beautiful methods of braiding, you will become a real master and will be able to change your hairstyles every day.
Braids are worn by both girls and women on weekdays and holidays. It all depends on what your braid style will be. To master simple braiding, it is better to first practice braiding a simple braid. It's easy to do. With the correct simple method of braiding, you will get a neat hairstyle, and its owner will not experience any discomfort.
How to weave the simplest braids

The simplest braiding begins with combing. Comb your pulled back hair with a wide-tooth comb. Comb the ends of your hair first, then gradually move higher and higher.

In this case, you will minimally injure your hair, combing will be almost painless, and your hair will untangle easily.


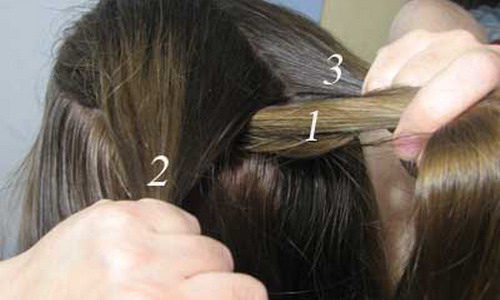
Before weaving simple braids, go through your hair with a soft massage brush. Divide all the hair on your head into three parts. Take the left part of the hair in your left hand, and the right part in your right hand.

Place the side strands alternately on the middle strand. In this case, the strand from the left hand will become central, and the strand that previously lay in the middle will go to the left hand.


While braiding, periodically stroke the strands of hair with your hands so that they do not get tangled with each other, are smooth and even. Braid the braid as long as you want.


Pay attention to the photo of simple braiding - a tail 10-20 cm long is always left at the end and secured with an elastic band or a hairpin.
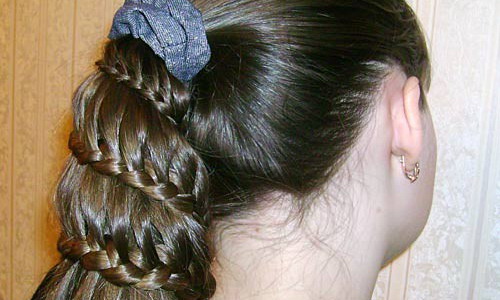
Braiding four strands (with photo)
A four-strand braid is woven similarly to a simple braid. Look at the photo of a four-strand braid - before braiding begins, the hair is divided not into three, but into four parts and overlapped one after the other. Follow the path of the strands in the figure, and you can braid such a braid yourself.


1. To create a beautiful hairstyle with such braids, first part your hair with a straight parting, then separate the back hair and pin it up so that it doesn’t get in the way.


2. Weave four strands of braids on each side of your head and secure their ponytails with elastic bands.


3. Next, comb the hair at the back of your head and connect the braids with it. Secure your hair at the back of your head with a bobby pin or elastic band.


4. Comb your loose hair. The result is this hairstyle: there are original pigtails on the sides of the head, and a ponytail at the back.
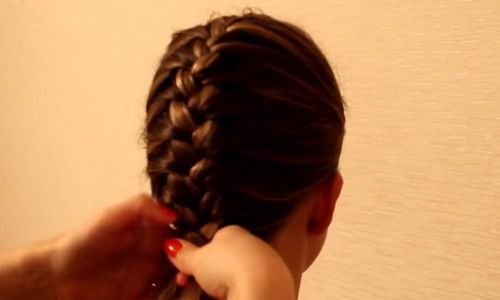
French braiding with step-by-step photos
Below is a step-by-step description of French braiding with photographs.


2. Separate the hair at the top of your head and divide it into three sections.

3. Place one side strand over the middle one, similar to a simple braid.

4. Place the second side strand over the new middle strand. Now all three strands should be in one hand (left), but separately.

5. Next, grab a strand of loose hair from each side near the side strands, combine the strands on the sides and continue weaving. Place the enlarged side strands on the middle one and weave them as in a simple weave.

6. Thus, continue braiding by adding loose hair to the side strands and transferring strands from one hand to the other. While braiding, grab your hair tightly and keep your hands as close to your head as possible. Then the braid will turn out neat and will stay on your head for a long time.

7. Gradually grabbing any new loose hair on the sides of the braid, continue braiding all the way to the back of your head.

8. Having reached the back of the head, you can immediately fasten the loose hair with an elastic band - make a ponytail at the end of the French braid. Or you can continue braiding loose hair in the form of a simple braid. The choice is yours.


Look at the step-by-step photos of French braiding to reinforce the information received.
Reverse French braid

1. Weaving a reverse French braid, like all other braids, begins with combing. Below are step-by-step photos of reverse French braids.


2. This braid is woven similarly to the French braid. But there are some differences here. Loose hair when added to the side strands creeps up from below. As a result, the braid becomes embossed.


3. Having braided your hair to the back of your head, you can also immediately secure it with an elastic band or continue braiding it in the form of a simple braid.


The braid needs to be braided tightly, then it will look neat and beautiful.


4. Comb the remaining ponytail with a brush. A longer ponytail looks more interesting, while a short ponytail looks more childish.
Step-by-step fishtail braids
Step by step, the fishtail braid is performed in the following order.

1. Comb your pulled back hair.

2. This braid is made from two strands. First, divide all the hair into two equal parts with a vertical parting at the back of the head.


3. The next stage of step-by-step fishtail braiding is separating one part from the hair one small strand at a time and throwing it to the hair of another part.

4. Do the same with the hair on the other half of your head.

5. Repeat all steps many times until you have braided your hair.


6. Leave the hair free at the required length (ponytail) and secure the braid with an elastic band.
Simple beautiful braiding with a tourniquet

1. Before braiding the braid, comb your hair with a brush.

2. Pull clean, dry hair into a high ponytail at the top of your head.

3. Distribute the ponytail into three equal parts.


4. Curl each section of hair to the right or left, but always in one direction.


5. Twist the three sections of hair together in the opposite direction.
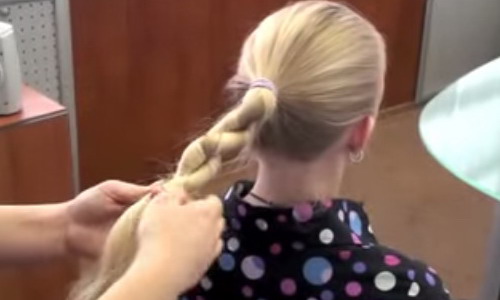
6. Secure the resulting tourniquet from below with a hair elastic.


7. Comb your loose hair (ponytail).
Simple braiding: how to braid a headband braid (with photo)

1. Comb your hair, you can comb it back or make a side parting on the left.

2. Weaving a headband braid begins by dividing the hair into two parts with a parting that goes through the parietal part of the head from one ear to the other.

3. Before braiding the headband braid, temporarily secure the back of the hair into a ponytail.

4. From the left ear or from the side parting on the left towards the right ear, weave a French braid.

You can do the classic version or with reverse weaving.

5. Gradually weave all the hair from the separated upper part of your head into a braid. Pick up new hair strand by strand.


6. Having braided the braid to the right ear, you can continue weaving a simple braid or make a ponytail.


You can strengthen the end of the French braid, and combine the free part of the hair with the total mass of hair at the back of the head.
Braiding: how to braid braids
1. Before braiding braids, comb your hair and divide it with a vertical parting from the forehead to the back of the head into two parts.

2. Before braiding braids, temporarily secure one part of the hair with an elastic band so that it does not interfere.

3. Separate a strand of hair from the forehead with a horizontal parting in the direction from the vertical parting to the temple and twist it 2-3 times to form a flagellum. Hold the flagellum in your right palm.

4. Separate the next strand of hair with a parallel parting and twist it in the same way with your left hand.

5. Twist both flagella together in your hands.

6. With your left hand, take the next similar strand and again make a flagellum out of it.

7. With your right hand, perform similar actions. Do not let go of part of the braided braid from your hands.

8. Continue braiding one half of your head to the back of your head.

9. Secure the finished braid with an elastic band at the back of the head.

10. Braid the braid on the other half of your head in the same way.

Braid "Double drop"
1. Wash your hair and dry it well. Using two horizontal partings, divide the hair into three parts (one at the level of the crown, the second at the level of the top of the ears), secure each part of the hair with elastic bands.

2. Using a vertical parting, divide the upper part of the hair into two parts.

3. Create a French braid on each half at the top of your head. Weave first on one side, then on the other. Then bring the loose ends of the hair together and secure with an elastic band.

4. Also divide the middle part of the hair on your head with a vertical parting in half. French braid first one half of the middle part of the hair, and then the other. Secure the loose ends of the hair with an elastic band, as in the previous case.

5. After finishing the “Double Drop” braid, simply comb the hair on the back of your head and leave it loose.
Braiding: how to braid “Dragon”


1. Before braiding the dragon braid, tilt your head and comb your hair against hair growth - in the forward direction.


2. Start French braiding from the back of your head to the top of your head.


3. From the top of your head, continue to weave a simple braid, securing the end with an elastic band.


4. The last step of how to make a dragon braid is to twist a simple braid and secure the end under the French braid.
Braid "Petals"

1. Comb your hair. Separate the hair on the left side of the head with a diagonal parting, going from the hairline on the right side of the head to the left ear.

2. Braid a section of hair into a French braid.


3. Similarly, separate a strand of hair on the right side of your head. It will start from a French braid on the left side of the head and continue to the right ear.

4. Create a second French braid on the right side of your head.

5. Thus, alternately braid the braids on the left and right side of your head and reach the top of your head.

6. From the top of the head to the back of the head, you need to leave a wide vertical strand of hair. Weave all the hair around it into French side braids.

7. Braid the vertical strand with a separate braid.


8. The final stage of weaving the “Petals” braid - at the back of the head, combine all the hair into one simple braid or ponytail and secure it with an elastic band. You can make several thin simple braids.
Braiding: how to braid a “Crown” braid

1. Braiding the “Crown” braid begins with combing from the crown in the direction of hair growth. Distribute them evenly in all directions.

2. Start from the back of your head into a French braid, collecting hair that grows from the crown to the hairline at the back of your head.

3. In the process of weaving a Crown braid, move around the circumference of your head in a clockwise direction.

4. Having reached the back of the head, where the braiding began, secure the loose hair with an elastic band and hide it under the braiding.


5. Hair can be decorated with decorative hairpins and flowers.
Method of braiding "Mesh"
1. First, comb your hair. The “Mesh” braiding method begins by separating a rectangular strand from the middle of the forehead and securing it with an elastic band.

2. Separate 2-3 more strands of a similar shape in each direction from it and secure each of them with elastic bands.
3. Divide each resulting ponytail into two parts.

4. Connect parts of adjacent ponytails into new ponytails and secure them also with elastic bands.
5. The tails near the ears do not need to be divided into parts. Combine them entirely with adjacent, higher-lying strands of ponytails.

6. After the second row of elastic bands appears on your head, throw all the ponytails forward (on your face).

7. In the center of the head in the crown area, separate a rectangular strand, slightly smaller in size than the very first strand.

8. Connect a new strand with half parts of adjacent strands and secure with an elastic band.
9. To the sides of them, continue the already familiar weaving.
10. You should have a third row of elastic bands, and the number of tails should be equal to the number of tails in the first row.

11. Comb the hair at the back of your head. Spray your hair with hairspray.
Braiding "Chamomile" braids
1. Comb your hair. Divide your hair with a vertical parting into two parts.
2. Divide each part from the crown into four parts with radial partings.

3. From the top of the head along the straight parting, begin to weave a French braid. When you reach the end, make a turn and start braiding from the second part. At the top of your head, gather your hair into a ponytail.

4. Start braiding the “Chamomile” braid from the top of the head with the next French braid on the same half of the head. Do everything in the same way, with a turn to the next part of the hair.

5. Perform similar weaving on the other half of the head.

6. Combine all loose hair into one ponytail or a simple braid at the top of your head.
Braids "Shells"


1. Comb your hair. Divide your hair with a straight vertical parting into two parts.


2. On each side of your head, create simple braids over your ears.


3. Twist each “Shell” braid in a spiral and secure with hairpins.


4. Decorate the “shells” with decorative pins or flowers.
Weaving method "Air cross"
1. Comb your hair with a brush. The “Air Cross” braiding method begins by dividing the hair with a vertical parting into four equal parts.

2. On each half of the head, make another diagonal parting - from the center of the back of the head to the top of the ear.

3. Start French braiding on the left side of your head. At the same time, grab the hair only from the top of the head. The lower edge of the braid should be free, not connected with the hair of the lower occipital part of the head.

4. At the end of the French braid, create a simple braid and secure the loose hair with an elastic band.
5. French braid on the right side in the same way.

6. Then start braiding a French braid on the left side of your head at the back of the head. It will look like a continuation of the braid on the right side of the head. Finish with a short, simple braid.

7. Undo a simple braid that is an extension of the French braid on the left side of your head. Continue braiding it again, but now in the form of a French braid. Weave the hair of the lower right occipital part of the head into it.
8. Decorate two loose ponytails or simple braids on each half of the head with decorative elastic bands, maybe with flowers.
Braid "Snail"


1. Comb your hair. Tilt your head forward a little and comb your hair again in the direction of its growth, i.e. all hair should lie from the crown in a radial direction.


2. Start French braiding from the crown of your head. Always grab new strands of hair from one side only.


3. Braid the “Evidence” braid in a spiral until the hair runs out.


4. Loose hair can be secured with an elastic band in the form of a ponytail or braided with a simple braid. Hide a simple braid under the occipital strands, braided into a French braid.
Snail tail


1. Comb your hair. Make a tail in the occipital-side part of the head.


2. Separate a third of the hair from the ponytail and weave it into a simple braid.


3. Twist the braid into a spiral at the base of the ponytail and secure it with bobby pins.


4. Depending on your desire, you can decorate the “Snail” tail with decorative pins or twist the ends of the tail using electric curling irons.
Bun with braided rim
A bun with a braided rim looks very strict and elegant.


1. Comb your hair. Make a low, loose ponytail at the back of your head and secure it with an elastic band. Section your hair over the elastic and thread the ends of your ponytail through the gap.


2. Divide the tail into two equal parts. Weave a simple braid from each part.


3. Wrap the braids around the base of the ponytail, which now looks like a bun.


4. Secure the braids with hairpins and bobby pins. Make sure that the ends of the braids are well hidden.
Swiss braid

The Swiss braid is woven with the assistance of an assistant.


1. Comb your hair. Create a low ponytail at the back of your head.


2. Divide the tail into three parts and twist a tourniquet from each, ask an assistant to hold them.


3. Weave a simple braid from the strands. It will look fuller and more voluminous than a regular braid.
(function(w, d, n, s, t) ( w[n] = w[n] || ; w[n].push(function() ( Ya.Context.AdvManager.render(( blockId: "R-A -185272-6", renderTo: "yandex_rtb_R-A-185272-6", async: true )); )); t = d.getElementsByTagName("script"); s = d.createElement("script"); s .type = "text/javascript"; s.src = "//an.yandex.ru/system/context.js"; s.async = true; , this.document, "yandexContextAsyncCallbacks");Braids are an attractive hairstyle for different occasions. They exist in different versions, differing in weaving techniques. For every girl there is a braid that suits her best. They are more suitable for medium and long hair. If they are short, then the extension technique is used.
When you don’t have time for complex styling, you can do simple, beautiful hairstyles. A step-by-step guide for all braids: you need to familiarize yourself with simple rules on how to quickly and easily learn how to create braids. They can be braided by both small children and adults.
Braiding "Heart"
Features of weaving ordinary braids
 You can learn how to braid your hair step by step using a simple master class. They are the basis, after which it becomes possible to create complex types of weaving. Such beautiful braids are created quickly. They can be done both for children and for yourself.
Step by step guide:
- Hair must be thoroughly combed and divided into 3 parts.
- With your left hand you need to grab the left strand and throw it over the middle one. The same action is performed with the right strand.
- Continue braiding and secure with an elastic band.
Braids that are braided on the sides look beautiful. It is necessary to create an even parting, but it is inconvenient to do it yourself. It's better to have an assistant do this. This option is suitable for a child in school or kindergarten.
Simple Braid with rubber bands. Hairstyle for medium, long hair. Braiding for children
Weaving "Dragon"

Step by step you can learn how to braid beautiful “Dragon” braids. They are made for children for school, for holidays and for everyday use. These braids exist in several versions: vertical, horizontal, oblique. To complete this you will need to follow the following steps:
- You need to visualize the line parallel to which the weaving is being done.
- Then the hair should be combed. You need to take a strand and divide it into 3 parts.
- To make it more convenient to braid, you need to number the strands: 1 is placed between 2 and 3, 3 between 2 and 1, 2 between 1 and 3.
- Then the tail is woven into a bun, borrowed from 1 strand. As a result, weaving continues, the curls are collected from both sides. It makes an excellent braid.
Work must be neat and tidy. At the end, you need to secure your hair with an elastic band or a hairpin.
Volumetric braid "Dragon" inside out
"French" weaving
 There's a step-by-step guide to getting attractive French braids. You can braid beautiful “French” braids in various ways. Recently, more and more options have appeared, but first you need to learn how to do classic weaving. The French braid is suitable for both children and girls.
- First, you need to comb your hair well. Then separate the strand from the forehead and secure it with an elastic band.
- You need to take 2 strands on both sides. The technique is somewhat complicated, since you have to work with 4 strands. It is better to do the work according to the master class to get the desired result.
- You will need to tighten the curls well.
Reverse French braid
African type of weaving

Very popular beautiful African braids, which you can also learn to braid yourself. This hairstyle is loved all over the world, but among the inhabitants of the desert continent they are traditional. Doing a hairstyle is difficult, and a master does the job better. If you still want to do it yourself, then you need to adhere to the basic rules of creation.
- Since all the hair is involved in the hairstyle, it is necessary to divide it into equal strands of 10-15 mm each.
- Braid all the strands into thin braids.
- To make the hairstyle even, it is necessary that the braids be directed towards each other in a horizontal direction.
- You need to braid the braid from the face, then you should not immediately separate it. It is advisable to make a horizontal parting, which will later be divided into parts.
It takes a long time to braid African braids, since you have to process about 400 strands. Some people do this with extensions, which causes them to pull out other strands as well. With these braids you can learn how to do other hairstyles.
How To Do Box Braids | With Cornrows
"How to remove African braids," "Afro braids" "2018" "Children's channel"
Danish style
 For long hair, you can learn how to braid beautiful braids in the Danish style. They are similar to a “spikelet”, only they are created in the opposite direction.
- The hair is collected at the back of the head and divided into 3 parts.
- The left strand is placed under the middle one. The same actions are also performed on the right side.
- While the curls are in the right hand, use the left hand to connect a small strand from the side to the left braid.
- To get a beautiful hairstyle, you need to take 3 cm strands. The left strand is placed under the middle one and woven into the left side.
- When the curls are in the left hand, a braid is created with the right, and the braid should be pulled in the other direction.
- During work it is necessary to change hands.
- When the place of braiding comes, the left strand begins to weave with the middle one, and the right one with the middle one. The result is a beautiful hairstyle for all occasions. This option is suitable for everyone, including children.
Kim kardashian inspired dutch braids!
Hairstyle "Spikelet"
 The hair is divided into 3 parts. At first, a regular braid is woven, and from braid 3 the work changes. 2 strands are picked up from the sides and then woven into the curls on their side.
Then the other part of the hairstyle is braided. To avoid a sloppy look, you need to backcomb your hair and use a massage brush to style it. The standard “Spikelet” hairstyle is perfect for a child.
4 basic DIY braids
Greek style
 This hairstyle is great for straight and curly hair. They gather, and the braid is woven from the temple from one side to the other. This way you can create 2 braids on both sides, and fasten the ends with hairpins. The remaining curls can be loose or in the form of a “spikelet”. You need to start weaving from a place near the ear, and the end will be on the opposite side.
Lesson 7. Greek ponytail, Greek braid. Hairstyles on yourself.
Hairstyles for short hair

Original styling is achieved not only with long and medium hair. The French Falls hairstyle goes well with bobs and bobs. 2 braids are braided all over the head, and in the central part they are fastened into a ponytail.
For short hair, “Spikelet” is also suitable, only the strands should be larger than 15 cm. If the curls are short, then there are artificial strands to create original hairstyles. Thanks to them, your hair will be thicker, and they are also very easy to work with. If the hair is about 4 cm, then African braids are suitable.
Varnishes, gels and mousses are used to fix braids. The braid turns out better if several days have passed after washing your hair. Before work, the hair is thoroughly combed. Any hairstyle will look attractive if the hair is neat, and this requires daily care. It is recommended to constantly use medicated masks and shampoos. In this case, even an ordinary braid will look neat.
Master class on quick braiding
Girlish braids are a symbol of tenderness, femininity and purity. Not only long curls, but also medium-length hair can be styled in beautiful braids. It’s no wonder that these hairstyles are on the covers of fashion magazines and are admired by fashionistas. There are a lot of variations of these hairstyles and you can change your look every day.
Varieties of beautiful hairstyles - how to do it for yourself at home
Before you start braiding any braid, you must wash your hair. When creating a beautiful hairstyle, it is advisable to use styling products. This will allow the braids to hold tighter on medium hair.
How to braid a spikelet on its side yourself - step-by-step description
spikelet for medium hair
A very comfortable and stylish hairstyle.
The curls in the spikelet will not fall apart, and the bangs will not get into your eyes.
Ideal for work, study and outdoor recreation. You don’t have to use styling products. Having mastered the creation of a classic version, you can combine this hair styling with other weaving options. You can make a pigtail in reverse, as well as a spikelet of six, eight and twelve strands. The reverse spikelet looks very original. The weaving procedure is similar to the classic version, only all actions are performed in reverse.
A reverse braid can add extra volume to thin curls.
An unusual spikelet shape is suitable for a celebration or a romantic dinner. It starts above the ear on one side of the head and gradually falls to the ends of the strands on the other side.
Video: master class on braiding with ribbon
The ribbon will decorate any braid. Watch the video tutorial on how to braid an unusual four-strand braid for yourself.
How to braid your own fishtail
This hairstyle really looks like a fishtail. A special method of weaving individual strands gives the braid an amazing shine and this attracts the attention of others. The hairstyle is suitable for every day and for holidays. Everything depends on the tightness of the weave and the chosen accessories for decoration. To make the braid more voluminous, pull the strands in different directions. This is great
Extensions attached to your hair with special clips will help you create a very voluminous side ponytail.

fishtail braid for long hair

Fishtail braid is suitable for both everyday life and festive events

fishtail braiding
Traditional Russian braid
The classic Russian braid will never go out of style. In a braid, the hair is not too tight, and this gives it the opportunity to “rest.” Creating a hairstyle is not difficult. This is a simple interweaving of three strands of hair. The ability to create a Russian traditional braid will allow you to cope with more complex hairstyles in the future, because they are all performed on its basis. allows you to solve the problem of alopecia.

traditional braid on one side
French braids
The hairstyle is based on a three-strand braid. It is pressed tightly to the head and slightly tilted to the side.
French braids can be woven in reverse, in a zigzag pattern, resembling a wreath or fishtail.
For medium-length hair, a braid braided from the bottom up works well. The head is tilted down and they begin to braid from the back of the head. When you reach the top of your head, make an ordinary braid from the loose curls and tuck it inside. From the remaining strands you can twist a chic bun and pin it with a hairpin. For long hair, a French braid is often used when creating. Therefore, this type of weaving is perfect for festive events.
A reverse voluminous French braid can also ideally decorate medium-length curls.

French braid twisted inside out

French side braided to one side
tourniquet
A braid is called a rope, a spiral, a rope. The hairstyle is very popular among fashionistas and is incredibly simple in technique. You can create a bohemian hairstyle for a celebration or come up with a twist for every day. But with any hairstyle, a girl will receive a lot of compliments. emphasizes individuality and courage.

braid for medium hair
Boho
Boho chic hairstyles are a hit of our time. When creating, they do not require accuracy, but they look stylish and fashionable. Dishevelment, negligence, chaos are their main features. The braid can be woven from part of the strands or from all the hair, or made into a wreath or headband around the head. should be short.
Boho braids are a vast field for experimentation.
During the weaving process, you can thread leather threads into strands, which will look beautiful, with bright feathers or other decorations. Looks amazing.

DIY hairstyles for medium hair
Let's look at ways to create the most popular braids on medium-length hair. This doesn't require much skill, it's very simple. The most important thing is the desire to look attractive. You can see haircut options for medium curly hair.
Greek circular braids

Greek braid for medium length hair
Make a straight parting from the crown to the temples or a little lower. From the parting you begin to make a spikelet. It can be done in two ways:
- pick up all the hair along the edge into a spikelet - starting from the top of the head and up to the face:
- You can braid a narrow braid only from the hair that grows around your face. There is no need to weave the main strands into the spikelet. You can unravel them or, after completing the braiding, put them in a ponytail.
Completing the Greek braid can also be done in different ways:
- make a crown from one ear to the second. In this case, the spikelet ends near the second ear and is secured with some kind of accessory. The remaining part of the curls will remain loose and this will add volume and unique charm to the hairstyle. This hairstyle is a little messy and messy. Looks perfect on curly strands;
- make a circular crown. The weaving goes around the head and ends in the place where the spikelet began. This option is more accurate. You need to gather all the hair into a neat spikelet in a circle, hide the ponytail under a large hairpin and spray your hair with hairspray. Below is a step-by-step photo of weaving a Greek braid.
You can watch a video of simple hairstyles for every day.

photo of step-by-step Greek braiding
Bohemian boho for long hair
Apply mousse to your washed hair to add volume to the strands. Curl your hair with a curling iron - from the crown to the ends. Blow dry your hair. Divide them along the parting into two halves. Braid a regular braid with 3 strands on both sides. You can find out what bangs should be like for those charcoal faces.
From the finished braid you need to pull out strands approximately 2 mm wide. This will give your hair a casual look.
Secure the braid with an elastic band or comb the ends with a thin comb. After this, your hairstyle will not fall apart. A bohemian style braid can be moved to another area of the head. For example - on the bangs or on the back of the head. You can learn how to strengthen your hair against hair loss after childbirth on our page.
French zigzag braid
A zigzag braid can only be done the next day after washing your hair. Pin your bangs up with a bobby pin and part them on the side you want. On the side with the smaller parting, select 3 identical strands and begin braiding. A proper zigzag braid only grips the hair at the top. When you braid on another area of the head, go lower and turn the braid in the opposite direction. Then continue braiding. These 90 degree flip shenanigans will create a zig zag. After this, during braiding, the braid will eventually take on the shape of the letter Z. The remaining curls can be gathered into a bun and tied with the original ribbon.

unusual zigzag weaving
4 strand braid
Place your well-combed hair into 4 equal strands. Move the leftmost strand over the second one. Move the third one above the one on the far right. Then the fourth strand should be drawn over the first. Next, we move the second strand over the fourth, the first over the third, and the third over the second. You can’t rush this weaving technique; you need to understand everything well. Otherwise your hair will get tangled. All strands should be stretched well and it will immediately become clear which one goes next. The result is a stylish and feminine hairstyle. You can see photos of the most unusual hair color.

four strand braiding
For girls
All mothers do not have to be hairdressers to create a beautiful hairstyle on their child's head. Braids will make a girl's hairstyle neat and will prevent her hair from becoming disheveled while playing outside.
Pigtail-flagellum - step by step
A flagellum in a pigtail? Tie the girl a tight ponytail at the back of her head and divide it into two equal halves. Twist the right strand a little to the right several times. Hold the tourniquet well with your hand, otherwise it will fall apart. The left strand is twisted in the same direction, do not let go of its tip. The resulting strands must be intertwined with each other and continue to do so along the entire length of the curls - to the very ends. At the end, secure the braid with a bright elastic band.

braiding with a flagellum
Little dragon - how to beautifully weave a braid step by step
Any girl will love this classic school hairstyle. Comb your baby's hair and moisten it with spray or water. Make a perfectly even parting from one ear to the other. The strands at the forehead should be divided into three equal parts. Place the left strand on top of the middle one and cover it with the right strand. This will be the base of the braid. Continue braiding, periodically weaving loose curls from the sides into the braid. When you reach the beginning of the neck, braid an ordinary braid and at the end tie it with a beautiful elastic band.