How to make an origami transformer out of paper. How to make a transformer out of paper? New origami technique. Here are some rules to follow
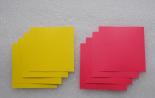
Not only children love toys. Many adults are also not averse to having fun, especially when it comes to cheerful groups when they want to have an interesting time. And here it can come to the rescue, since it is in this technique that the original transforming star, capable of modification, was made. Another name for this is the ninja star, the transformability of which will surprise many.
To create such a star you will need 8 small sheets of square paper, it is better to take them in different colors - 4 of each.
![]()
We begin to put together one module. To do this, we make folds along the diagonals.
![]()
Then we make another fold in the transverse direction.
![]()
Having arranged the workpiece as follows, we make folds in the upper corners.
![]()
Now we fold one of the blanks of the future star in half, making a fold in the vertical direction.
![]()
The lower right corner needs to be carefully tucked inward along the previously made folds.
![]()
Using the same principle, it is necessary to make 7 more modules - one half of which is red and the other half yellow.
![]()
Now we proceed directly to assembling the star. To do this, take modules of different colors and place one inside the other.
![]()
On the plane it should look like this - the top edge of the red and yellow module should be located on the same line.
![]()
The protruding corners of the red blank must be bent inside the yellow module. This is how the first connection was made.
![]()
We continue to connect the modules in the same way, alternating colors.
![]()
The end result should be a ring of 8 modules.
![]()
If you gently press on it from all sides, the individual elements begin to move and our craft takes on the appearance of a star, as in the photo. You can return the star to its original position by moving all the modules to the sides in the same way.
Many boys are very fond of transforming toys. This is due to the fact that there seems to be one item, but at the same time you can play it as two different characters. The most popular are robots that turn into cars. They can be made not only from plastic, but also from other materials.
The world of origami is very large, in it, in addition to the usual paper crafts (appliques, topiary, quilling crafts), there are also transformers, and after reading this article, you will learn how you can make one of them with your own hands. After all, it will be doubly interesting for a child if he first makes it himself and then just plays with it.
How to make a transformer out of paper?
To make it, you only need a sheet of silver paper (paper-based foil), suitable for folding origami. Just keep in mind that a standard A4 sheet will be too small for such a craft, it is better to take a larger one (A3 or A2).
Progress:
- Cut out a square from a sheet of paper. We fold it along the diagonals, and then with the corners towards the center.
- Bend the top corner back down, and then fold the right side towards the left.
- Take the top layer of paper by the edge and move it to the side. We should get the figure shown in the picture.
- Fold the square on the other side as well. Then we raise the middle of the upper square to the top. We do the same with the second one. As a result, we get the basic origami figure “Bird”. We lower the ends of the paper on top to create a figure like in the photo. We do this on the other side as well.
- Fold the resulting wings in the middle and down. After this, we lift the lower triangle up on both sides, while directing the side wings towards the center.
- Swap the top and bottom of the workpiece. Fold the top wings in the middle. Fold the diamonds formed on top and behind in half upwards. Fold the side corner towards the center, and then bend it inward. We do this with all four corners.
- We turn the resulting workpiece over again from top to bottom. Doing as shown in the photo, we pull forward the triangle in the middle of the part.
- Next, we fold the transformer out of paper according to the proposed schemes.
- This is what we got as a plane. Now we make his arms, legs and head, and we get a robot.
There is a second master class on how to make a transforming robot out of paper.
Paper transformer - master class
To do this, we need to print (or draw) the details. For this, it is better to take thick paper (for example: whatman paper) or matte white cardboard. They can be immediately colored or simply black and white.
Then we carefully cut out each detail. It is very important to maintain all allowances for gluing.
After this, we glue each part separately. We do this carefully so that there are no traces of glue left anywhere. Let them dry well. Our transformer should not only be three-dimensional, but also move and fold from a robot into a car. To do this, we connect with wire or strong wire according to this scheme all the prepared parts of our future super hero.
Many boys like to make throwing weapons such as shuriken from paper. It can be used in games and entertainment. These four-pointed stars are origami, which is quite easy to make with your own hands.
To create such a throwing weapon, you do not need complex drawings or a template, just dexterous fingers and a sheet of paper. If you don’t want a fight with such shurikens to end in self-harm, or even death, do not use iron in the manufacture; the most you can make this throwing projectile from is cardboard. This is not a treasure sword. And diagrams with descriptions and pictures will help you fold it out of paper, which will clearly demonstrate exactly how you need to bend and fold a sheet of paper to make a shuriken and not a machine gun. What a shuriken looks like in the original will help you imagine a photo or drawing on the Internet.
Many boys like to make throwing weapons such as shuriken from paper
To create ninja shuriken, you need to create a transforming blank. In this case, a diagram will be described that will help create an 8-pointed star.
- You need to prepare the paper. Each module needs its own paper sheet. It is best to do this type of work using paper of different colors.
- The sheet is bent diagonally. Then it bends again.
- The bottom left edge should be folded into the center of the paper.
- Then the upper right corner is also folded into the center of the sheet.
- The top paper layer is folded from top to bottom.
- The workpiece is turned over. The triangle at the top needs to be lowered down by pulling its upper corner.
- The corner formed at the bottom is bent into the middle. This is the final stage of creating a transformer blank.
- Now you need to repeat the above steps to make 7 more of the same blanks.
- You can start assembling the shuriken. To do this, the right corner of the triangle is turned away from one workpiece. You need to insert the left corner of another workpiece into the formed “pocket”. This must continue until the end.
The 8-pointed shuriken looks very beautiful, especially if it is multi-colored. They can decorate the interior.
Gallery: paper shuriken (25 photos)


Flying paper shuriken (video)
DIY 4-pointed paper shuriken: diagram
A boy who wants to pretend that he is a samurai or a ninja should definitely make such a craft.
Master Class:
- You need to take a square-shaped sheet. You can tear out a piece of paper and make it square.
- Then this leaf is resolved in half. You get 2 rectangles. Alternatively, you can use paper of 2 different colors, so the craft will be much more beautiful.
- After this, each rectangle is folded in half lengthwise. You should get 2 new rectangles, but thinner ones.
- Now you need to fold the corners of the shapes. One corner bends up and the other corner bends down.
- Now the rectangle needs to be folded along the lines. They were symmetrically laid out in a triangle earlier.
- Symmetry should be checked at this stage. Two figures are placed side by side. If any of them are larger or smaller, you need to redo the workpiece. The correct shuriken can only be made if both parts are equal.
- To connect the parts, the right figure is turned over and carefully attached to the left figure.
- The modules are attached to the “pocket” formed at the bottom of the triangle.

A boy who wants to pretend that he is a samurai or a ninja should definitely make such a craft.
At the last stage of assembly, it is necessary to bend the edges of the fastened figures.
Paper shuriken: the simplest origami pattern
This fun activity is perfect for keeping the kids occupied. In addition, the operating scheme is as simple as possible.
- At the first stage of work, you need to make a square from a piece of paper. To do this, one edge of the rectangular paper should be folded towards the opposite edge. The part of the sheet that remains at the bottom must be cut off.
- The diagonal of the square is collapsed. In order to do this, you need to bend the upper right corner diagonally. Excess paper is cut off.
- Now the preparation of parts begins. The squares are folded in half. Rectangular shapes were formed.
- The resulting figures are cut to length with scissors. Instead of a knife, you can use a special paper knife; it will be easier to work with.
- Now it is important to bend each piece of paper along its length. You need to align the edges of the shapes by bending the corners diagonally. In this case, one corner of the figure is bent down, and the other is bent up.
- Now the figures need to be compared. They should be a mirror image of each other. If the figures are not equal, it is recommended to remake one of the two blanks. Otherwise, you won't be able to make the right shuriken.
- Now each figure needs to form a triangular fold. To do this, the top edge is bent diagonally.
- At this stage you can begin assembling the shuriken. One figure turns over to the other side. One part is placed perpendicular to the other. This is how their connection should occur.
- The upper corner of the lower part is folded into the previously formed “pocket”. A similar action is performed with the lower corner.
- Now the design needs to be carefully turned over with the front side facing the needleworker.
- We need to keep turning all the corners.
- Then the final fold is made.
To make the craft last as long as possible, it is recommended to wrap it with tape. This will prevent it from falling apart.
What tools and materials do you need to prepare?
Working on shuriken is working with paper. This type of creativity, like any other, requires the master to prepare materials.

Working on shuriken is working with paper
In this case, you will need the following materials:
- Paper sheet. This can be ordinary A4 printer paper or colored paper. The ideal option for creating shuriken would be to use special origami paper. You can find it in stationery stores.
- Scissors or paper knife.
- Scotch. It is not necessary to use it, but with it the shuriken will last much longer.
Beginner Warnings
In such painstaking work, as in any other, it is important to take timely precautions.
Here are some rules to follow:
- The ends of the shuriken are quite sharp, especially if it is wrapped with tape. That is why it is not recommended to leave this craft near small children.
- It is important to be careful when throwing shuriken. There have been cases where people have injured themselves.
- No need to throw it at anyone. Shuriken can hurt a person or animal. Especially do not throw the star into your eyes, as its ends are very sharp.
- It is important to be careful when working with scissors.
- You can seriously cut yourself on the paper, so you don’t need to run your hands and fingers over its edge.

In such painstaking work, as in any other, it is important to take timely precautions
- To assemble the parts into a shuriken without any problems, you need to make all the folds very carefully.
- After assembling the star has been completed, it is important to thoroughly wrinkle all the previously made folds. This will also make the final work easier.
- To make good folds, you need to crease them with your fingernail. But do not press too hard, otherwise the paper may tear.
- To make the star look good, it is important to first check the symmetry of the parts. If they are not symmetrical, then the sriken will not fly.
- All folds must be aligned when moving to the next stage of work.
- If you use magazine paper, the shuriken will turn out as correct as possible.
- This craft can be used as a decoration for a glass of cocktail. To do this, just stick a small stick or toothpick into the center of the star.
Those who love puzzles, ingenuity tasks and crafts simply need to pay attention to the transforming cube made of paper. Many people call it a hexahedron, which means a polyhedron of many identical squares. You can find it in stores, or you can make it yourself. You can create not only the geometric figure itself, but also its variations.
What does sweep mean? This is a diagram with which you can make one or another craft from paper or other material, for example, cardboard. Before you start working with a transformer, you need to be able to do a scan. To create it you will need:
- Paper or colored cardboard.
- A simple pencil.
- Ruler.
- Scissors.
 As mentioned above, a cube consists of several squares, in which absolutely all sides are equal to each other. First you need to draw a large square in the middle of the leaf. It is worth remembering that squares have angles of 90°. And also for those who forgot, the cube has 6 faces. It follows from this that there should be exactly six squares on the sheet. In addition to these, we have one extra left and we just need to depict it on the side of some square. Now all that remains is to draw allowances (0.5-1 cm) on three squares on the side and cut off the corners from them at an angle of 45°. The result should be something like this:
Now you need to carefully cut off all the excess, bend the edges, glue special allowances and get a figure.
Origami transforming cube
To make a transforming cube with your own hands in origami style, you need to remember how modules are made. It is thanks to the modules that the cube can be held together without the help of glue, and the toy itself will turn out to be very interesting and unusual. Let's move on in more detail to the question of how to make an origami transforming cube out of paper.
Thus, a module was created. For a cube of such modules you will need six pieces. All six modules must be done in the same way. Please note that each of them has pockets into which other modules will need to be placed. Now all that remains is to connect all the origami parts to create a figure. Do it according to the scheme so as not to make mistakes:
The transforming origami cube is ready. To make your craft more beautiful, you can make each edge a different color or texture.
In addition to square paper crafts, you can also make such a magical plant as a rose. Many people wonder how to make a cube rose out of paper if the flower has round delicate petals. Everything is very simple if you know the diagram or see the template in front of you. So, to make a rose you only need colored paper. You can choose the color of the rose yourself; the example shows a pink rose. First you need to prepare pink and green paper. You need three pink and three green squares measuring 15x15 cm.

We work with green paper in the same way as we did with pink sheets. It is important not to make a mistake in the last step, otherwise the cube will turn out incorrect.
It's time to put our beautiful plant together. And we will start with green modules, in which one corner is sharper and larger than the other. It is with a sharp and large corner that you need to connect one module to another, putting the triangle into the pocket. The end result should be a small cube.
 Now let's move on to the flower bud and as you noticed, all the modules are symmetrical to each other, so we can insert them with either side into the module pocket. It is important to remember that you need to insert the corners into the pocket so that the bends of the sheet are directed towards the middle. We put the long corners of the pink one into the pockets of the green module. Now we straighten the green module and carefully lower the corners of the bud.
Thus, we got a beautiful origami-style rose. If you suddenly want to fold it back into a cube, then do everything exactly the opposite and you will get a green-pink cube.
In addition to such crafts, you can make many other interesting figures that came to us from Japan, where our ancestors came up with ways to create cubes and transformers. By the way, transformer mask You can not only draw them, but also do them separately, attaching them to a toy.
Attention, TODAY only!
Guys, hello! You and I have already made quite a lot of various paper crafts using origami methods. And birds, and animals, and equipment with flowers, whatever they collected. Today we will make a paper transformer with you. Not quite a Decepticon or an Autobot, but an ordinary cube, but not a simple one, but one that can transform. So let's get started:
1. What do we need?
Firstly, this is, of course, a sheet of paper. It can be simple, it can be colored - your choice. But the paper size is defined: 12*24 cm
Secondly, scissors. We just can’t make a cube without scissors
Thirdly, tape. Scotch tape will be needed to hold various elements together.
Fourth, a ruler and a marker. You can’t make mistakes, otherwise the cube will transform crookedly.
2. So, let's get started:
Our sheet is 24 cm long and 12 cm wide, now we need to divide the width into 3 zones. The first zone is 5 cm wide, the second is 4 cm, the third is 3 cm. Now we divide the sheet crosswise into 8 zones, as shown in the picture below: ![]()
Now let's cut the workpiece along vertical lines, getting 8 strips, each of which has 3 squares, now you need to bend along the strips to get the letter P:
![]()
We connect the edges of the strips, seal them with tape, like this, so that we get triangles:
![]()
Now you need to place the triangles on top of each other, and then carefully glue them with tape as shown in the figure. The result will be 4 double figures:
![]()
Now we need to repeat the previous operation, except that instead of triangles and us, these 4 double figures will appear. Glue it together so that you get 2 quadruple figures:
![]()
![]()
Now you need to place the blanks in such a way that there are squares on top with sides of 3x3 cm, and at the bottom there are edges that form an angle. And again we need to glue a strip of tape between the 2 upper squares:
![]()
Well, that's it, everything is ready, now you can spin it and put other figures.