Topiary photo master class. How to make topiary with your own hands. Topiary photo master class Topiary “flying cup”
We bring to your attention a master class on making topiary for March 8th in the form of the number 8. By analogy, you can make any numbers, dollar or euro signs, etc.
To make topiary by March 8 you will need:
Corrugated cardboard;
Synthetic underlay for laminate;
Scissors, pen, pencil, thick film, glue stick, Titan glue.
So, draw the number eight on cardboard and cut it out (in this case, thin cardboard was used, so two templates were used for one base).

By analogy, cut out the same templates from the backing, two per figure eight. The volume of the workpiece will depend on the thickness of the substrate. In this case, the substrate is 5-6 mm thick, so two blanks are enough; if you have thinner ones, you can use four pieces (two on each side).
Next, glue two cardboard blanks and place them under the press. Cut strips of film with an approximate width of about 1 cm. Then apply Titan glue to one side of the cardboard, glue a figure eight from the backing, and press. Also design the other side. Then glue the edge of the cut tape and wrap it around the figure eight, pulling the strips slightly. The not yet wrapped workpiece looks from the side as in photo 4.
And after winding, the blanks will look like in photo 5. Then use your imagination and create. In this case, the figure eight was made on a wire leg. The stem and the workpiece itself were wrapped with bias tape.

Important: this workpiece will melt from a large amount of hot glue. So you need to glue the tape carefully, dripping a drop of glue. You can also use “Titanium”, but if you pour a lot of it, it may appear unsightly through the tape. Also, such a blank can be pasted over with coffee beans, it can be wrapped in corrugated paper or temp tape and used in a suite design.
MKOU "Dubrovinskaya secondary school"
Topiary "Coffee tree"
Classroom teacher:
M.N. Anchugova.
Target: making topiary from coffee beans.
Tasks:
-
will introduce you to historydevelopment of topiary;
- develop aesthetic taste;
Teach manufacturing technology;
Instill labor and accuracy skills.
Purpose:
Coffee topiary is a wonderful decoration for the interior of an apartment, an original hand-made gift for loved ones.
Coffee beans are by far the most popular material for creating topiary. They look quite chic, bring happiness to the home, and have a unique coffee aroma that creates an atmosphere of warmth and comfort.
Topiary is a man-made decorative tree. Now it is made from various natural materials and improvised means. This art originated in ancient Rome. The first topiaries were skillfully pruned trees in the gardens of Roman patricians. Gardeners gave the crowns of plants bizarre shapes, thereby creating the likeness of statues and other decorative items.
In its development, topiary has gone through many changes: the modest and painstaking work of nuns in medieval monasteries, decorative trees created on a grand scale in the Renaissance, gardens and labyrinths in Holland and England in the 17th century, etc.
Today, topiary is an incredibly popular souvenir. A tree made from coffee beans, in addition to visual pleasure, brings olfactory pleasure. After all, even after processing, the grains continue to smell, filling the room with a wonderful aroma and creating a cozy atmosphere.
I, as a class teacher, decided to invite my fifth-graders to make a topiary “Coffee Tree” with their own hands and give it to their mothers.
The main material in the production of coffee trees is, of course, coffee beans.
We purchased Arabica coffee beans (several bags); the base is a plastic ball (We took plastic balls from the “dry pool”);
trunk - bamboo sticks for flowers;
a pot or plastic glass (“sippy cup” also works well);
solution for fixation (used alabaster);
water;
glue gun and glue sticks;
ribbon, decor for decoration;
scissors;
Making coffee tree:
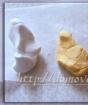
We connect the base of the crown (ball) and the trunk (bamboo stick), (we make a hole in the ball to insert the tree trunk);
Wrap the trunk with tape (string);
We cover the coffee topiary with our own hands with coffee beans;
The base is applied to the glue in two layers. By the way, about glue. Don’t overthink it, ordinary PVA glue will cope with this task.
Divide the grains into two parts. Those that are worse and smaller will go to the bottom layer. And from the most beautiful ones you need to make an elegant top layer. Using a glue gun, firmly glue the grains to each other so that there are no gaps.
When the crown is ready, you can make the trunk. We wrap the stick for the trunk with tape (string);
Prepare the soil: pour a small volume of water into a container, add alabaster. Pour it into the pot, insert the tree in the center and let the mixture harden. When the surface is dry, cover it with coffee or other materials.
After the entire topiary is covered with grains, you need to dry it;

This is what we got!


All mothers were pleased with their children's gift!
To create a mini topiary I needed:
Once the materials are ready, you can begin creating the topiary.
In order to make a base for a flower, you need to take several newspapers and form a ball. The shape of the ball will be preserved if you wrap the ball with tape.
For the stem, you can use either a branch or wooden skewers fastened together. In my case it was skewers. Connect the branch/skewers to the flower base using tape. Next, you need to wrap the stem with a green ribbon, securing it at the bottom and top with glue.
Flowers from napkins that resemble small peonies are very easy to make. To do this, you need to take a napkin, fold it in four, and fasten it in the middle with a stapler. Next, you need to cut out a circle with scissors. After the circle is ready, you need to lift each layer of napkins to the base. The work is painstaking, however, what beautiful little peonies come out as a result! To create my topiary, it took about 35 flowers, 25 of which were white, 10 were pink.
Using glue, attach the flowers to the spherical base. Pay attention to the fact that you should not have any gaps.
To make the pot, I needed a plastic cup and wrapping paper. You can buy a ready-made pot or design a plastic cup in your own way.
It is necessary to secure the topiary in a pot. For this you can use plaster or “liquid nails”. To prevent it from being visible what you secured the topiary with, you can use stones for decoration, green threads, or something else.
When the topiary is ready, you can decorate it. I used a butterfly for decoration.
The gift for March 8 is ready! Try it, I'm sure you will succeed! Moreover, it is incredibly easy to make such beauty!
Topiary for March 8
Topiary is a great DIY gift for any upcoming holiday. If you have an hour and a half of free time, desire and imagination, then you can
Source: biz-hobby.ru
Kaleidoscope of ideas
EVERYONE has had such a tree for a long time, but I’m somehow behind... I now have two daughters-in-law and by March 8th I decided to give them, coffee lovers, a gift - a “Coffee Tree”.
Topiary (topiary, topiary) - decorative, figuredly trimmed trees and shrubs. Modern topiary art is not limited only to working with plants. Original small trees, for the production of which natural materials are used, are also called topiaries. They fit perfectly into any interior and serve as home decoration. Moreover, topiaries are often called trees of happiness and therefore everyone is happy to receive such a craft as a gift.
I would like to note that topiaries are not miniature copies of any specific trees. This is a purely decorative thing, in no way pretending to compete with nature. Consequently, it depends only on the imagination of the creator what shape the crown of his own tree will have. The most popular shapes are cone and ball. Various materials can be used as a base. Some people find it convenient to work with a floral sponge or polystyrene foam. The original idea is to make blanks from construction foam. They turn out perfectly smooth and do not require additional processing, which creates additional ease of use.
Various feathers, pebbles and shells, moss, nuts and dried flowers, as well as ordinary wood shavings are suitable as decoration for the crown, and, of course, artificial hay, ribbons, beads, decorative butterflies and birds are used.
A beautiful and cheerful tree immediately attracts all eyes. Moreover, topiary can be made for any interior. Depending on the size and appearance of the tree, it can be installed directly on the floor, on open shelves, a fireplace, a coffee table or bedside tables.
I decided to keep up and also join the owners of such a happy tree!
But I will give myself such a gift a little later, but for the beloved girls of my sons, just in time for March 8th, I tried to make a coffee tree and am sharing my work with you. 

So, in order to make a coffee tree we need:
*a base for a tree (it can be a pot, a small vase, a cup, an interesting bottle of cream (shampoo, etc.) and in general, anything you like, because the base can also be decorated!)
*natural coffee beans
*base for the crown of the tree (this can be a ball from a children’s dry pool, a round Christmas tree toy, a plastic ball, a foam ball - sold in specialized stores for handicrafts, a papier-mâché ball, etc.)
*thermal gun and glue in the rods for it
*the base is a trunk for a tree (this can be a twig, a Chinese stick, several interconnected matches for a fireplace or several wooden skewers for a barbecue, wire, etc.)
*decorative materials for decoration.
My process of creating a tree looked like this:
I hope that you understand my explanation.
The tree turned out to be 21 cm in height, crown diameter - 9 cm.
Have fun and useful handicrafts!
Topiary – Coffee tree – tree of happiness, Kaleidoscope of ideas
Kaleidoscope of ideas EVERYONE has had such a tree for a long time, but I’m somehow behind... I now have two daughters-in-law and by March 8th I decided to give them, coffee lovers, a gift - a “Coffee Tree”. Topiary
Source: topchiy.com.ua
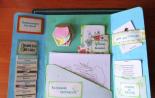
Magnets topiary template download
There can be only one template for making topiary for the refrigerator.
Here's an idea to make clothespin magnets for the refrigerator. A template for an unusual topiary. Fridge magnets Umbrellas with flowers Magnets. Find this Pin and more on magnetic topiary by galyalapka. Pictures upon request topiary magnet topiary magnet. Handmade magnets. Fair of Masters - handmade.
Mejores 186 images de TOPIARIOS en Pinterest Arreglos. Fridge magnet “Topiary”.
Salt dough panel master class. Magnetic cups photo 1. Topiaries, souvenirs and compositions from COFFEE BEANS (55) (518×700, 396Kb). 20+ Ideas Créatives avec les DIY de Bricolage Pâques. Voir cette épingle et d'autres images dans Topiary, Template. The master and I decided to make magnets.
Then I cut out a heart-shaped template from paper and made three Topiary blanks using it;
DIY coffee magnets for the refrigerator: right away. MK topiary magnet Country of Masters. Explore Julia SpiriUS's board "February 14th" on Pinterest. See more ideas. A template of a large flower in a pot. Manufacturing process: Salty heart magnets. Topiary magnet: DIY for the refrigerator, master.
Cat panel made from salt dough. First of all, you need to make a cat template, which. How to decorate your apartment with hearts for Valentine's Day. Topiary, souvenirs and Pattern Butterfly Craft product March 8 Assembly Fragrant. You need to cut out a heart-shaped template from paper, Topiary; Decorations with your own. Topiary magnet Pinterest magnets. New Year's frame - magnet with Santa Claus and Snow Maiden. News HOME DECOR Pinterest Pantofi de copii. There is a template, you can attract children to creativity. Read Topiary magnets Read. Hanging STAR made of paper, luminous, white, ass.3, 60cm, kaemingk, art. 481503 – Suspended. Place the rooster template on the dough crust and cut along the contour. Topiary. Găsește acest Pin și încă altele în topiary magnets de la galyalapka. Vezi mai multe. template and blank. Cute magnets are great for symbolic trying on the Topiary pattern. DIY money fridge magnets in the form of Topiary using a magnet template. Explore Anna S’s board “Magnets” on Pinterest. See more ideas about Magnets MY WORLD: LiveInternet – Russian Online Diary Service. 

Magnets topiary template download – Wow!
Magnets topiary template download – Wow!
Topiary (topiary) is a garden with artistically trimmed plants and green sculptures. The art of topiary has a long history. In Ancient Egypt and Persia, people learned to give trees and shrubs geometric shapes. The most famous example of topiary art is one of the seven wonders of the world - the Hanging Gardens of Babylon in Babylon. Original small trees, for the production of which natural and artificial materials are used, are also called topiary or European tree. This is a decorative thing, and it depends only on the imagination of the creator what kind of crown his tree will have.
Oriental bonsai trees, like topiaries, are called trees of happiness, and if coins are attached to the branches - money trees, so everyone is happy to receive such a craft as a gift and decorate their home with it.
In the same section we place various types Christmas trees , except for Christmas trees belonging to the category suite design .
A variety of topiaries, or “trees of happiness,” can become not only a talisman and a bright interior decoration, but also an excellent gift for the upcoming holidays. In this master class, we invite you to make a flowering topiary tree out of paper to create a positive mood and remind you of the arrival of spring.
Required tools and materials:
- a foam ball base (if you don’t have it on hand, you can roll a ball out of crumpled paper and wrap it tightly with napkins and threads)
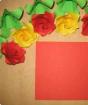
- colored double-sided paper for flowers (at least 5 A4 sheets of each color)
- large beads
- a twig (you can take a real twig, one from the store, or use bamboo chopsticks)
- small flower pot, glass or jar
- hot glue gun or other reliable and transparent glue
- pencil, scissors
- braid, ribbon and felt for decoration (optional)
- a stick with a metal ball at the end (bulka) to give flowers volume
- soft backing (you can use a regular foam sponge)

Progress
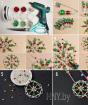
There is nothing complicated in making topiary, so you can do the work together with your children. First, you need to collect all the necessary materials and think over the colors and decor of the future “tree of happiness”, then you can start creating blanks with flowers. We propose to make each flower from two parts of a different shade, so that in the end they look more lush and elegant.
To reduce your work time, you can buy a flower-shaped cutter from a store that sells scrapbooking supplies (see photo above). With this device you will quickly cut the required number of blanks (this topiary took 5 sheets of paper in two colors). If you don't have such a "magic" device, just use one of the suggested templates or come up with your own.

Flat paper flowers will not form a lush crown, so they need to be given a more natural shape. To do this, use a special tool in the form of a metal ball (you can buy it in the craft department) or find a stick with a rounded end. Keep in mind that the smaller the diameter of the ball, the more the petals will bend.

To prevent the paper from creasing, press the blanks only on a very soft substrate, firmly but gently pressing the ball into the center of the flower.


Each flower consists of three parts: two curved paper blanks and a bead core. When the petals take a curved shape, use a glue gun or strong transparent glue to glue them together, securing a bead in the center.

Now you can start making the “tree of happiness”.
Glue the paper flowers onto the ball close to each other so that there are no gaps between them (this is especially important if you are using a homemade base rather than a store-bought one).
It is better to secure the topiary trunk immediately or at least mark the place where it will be located. By the way, a branch or stick can be painted in any color of acrylic paint.

When the crown and trunk of the topiary are ready, take a pot and install the tree in it. To prevent the composition from falling apart, you need to fill the pot with crumpled paper and secure the “tree” in the center with a large amount of silicone glue. The top of the pot should be covered with a piece of felt, fabric or cardboard so that the contents of the vessel are not visible.

The final decorative touches remain!
The container used to install the topiary can be painted, wrapped with braid, or decorated in some other way. We wrapped the pot in wide lace and tied a flirty bow on the trunk of the topiary.

Your “tree of happiness” is ready, and we really hope that it will bring joy to you and your loved ones!