How to make a dragonfly from colored paper. DIY dragonflies made of paper and cords. Video master class
Today we have a fun day on the agenda paper craft - dragonfly, which flaps its wings while sitting on your finger. Not even sitting, but just touching with your nose. Real dragonflies don’t sit like this, of course, but their bamboo sisters native to southeastern countries do it very cleverly. We brought these from Thailand and China - this is one of the small local crafts, now I found photographs of a Vietnamese village, whose residents have been making these cool toys for more than one generation. 

Well, what can I say, I want one again! 🙂 Since our bamboo dragonflies broke long ago, and I don’t have bamboo, and probably you don’t either, I had to think about how to make these from scrap materials.
So, let's take:
- colored paper or cardboard
- scissors
- pencil
- plasticine
- pens, pencils, paints, stickers - what we will decorate with.
We use a dragonfly stencil. I cut out a template no larger than 10cm wide.

We take cardboard or paper, mark a line with the side of scissors or the blunt side of a stationery knife, stepping back 5 cm from the edge.

We bend the cardboard along the intended line, apply a template folded in half so that the line of the dragonfly's body coincides with the fold line of the paper. Trace with a pencil and cut out. I recommend making the tail part a centimeter longer - it’s better to cut off the excess when balancing than to add more glue.
If this is not your first dragonfly, then you can decorate and color it at this stage, but if it is your first, then it is better to do this as a test to understand the principle, and color it at the end. I'll decorate right away.

Now the most important thing is to glue small identical pieces of plasticine to the ends of the wings on the reverse side. And we bend the “nose” of the dragonfly inward.

Balancing the dragonfly:
- if, when installed on the “nose”, the dragonfly falls forward, it either has a too short tail or a too large “nose”. Try to first reduce the size of the “nose”, and if this does not help, “grow” the tail. This is why I advise you to immediately cut the tail a little longer.
- If a dragonfly falls on its tail, cut off a little of it - it will outweigh. Or try making the nose triangle bigger.
- if a dragonfly falls sideways, equalize the weight of the plasticine weights on the wings.

A dragonfly made from cardboard will last longer, but made from notebook paper it will be fun to flap its wings, as if alive. Try this with a child paper craft “Dragonfly” - have a lot of fun! Almost all of our family members took photos with dragonflies :)


This cheerful dragonfly will be an excellent children's craft, made with your own hands from paper. Children can do it on their own or with adults. And here small elements of appliqué are used, because paper is a unique material. First, you can create all the colored parts of the desired shape and size, then combine them into a beautiful craft. And after that, make it even brighter, even shiny, using gel pens, felt-tip pens or watercolors. Creativity kits are very expensive in stores, but not colored paper. And you shouldn’t think that this is banal, uninteresting, or has exhausted itself. And with paper you can come up with a variety of crafts - unique and inimitable. On the site you will find an inexhaustible number of ideas. In this lesson we will look at modeling a dragonfly.
To create a funny dragonfly, prepare:
- colored paper;
- a pencil for sketching the body and wings, an eraser just in case;
- scissors;
- glitter pens or markers;
- glue.
How to make a paper dragonfly with your own hands
1. The first stage of any creative lesson begins with the preparation of unique materials that allow you to easily create wonderful crafts. In the case of a dragonfly craft, you will also need, in addition to paper, pens in order to decorate the new toy in the future.
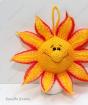
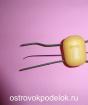
2. It is better to make the body of the insect dense, from cardboard. Draw a sketch of the dragonfly's body with a thin simple pencil - the body, head and tail. It will be one piece fastened together. The head and middle part are round, the tail is oblong. Cut out a blank that looks like a snowman. But it’s better to make it bright, for example, in this case, green.
3. Next, prepare the wings - they will be oblong and double. Cut out pieces in pairs from light green and orange paper. Also cut out eyes from white paper. To make the dragonfly look funny and slanted, make the eyes of different sizes.
4. Glue the wings on the sides, spreading them to the sides. Glue the eyes onto the top circle-head and draw the pupils with a black pen. Also draw a mouth - a thin black stripe.
5. Now, when the figurine is ready, and even the little face is looking at us and smiling, decorate the resulting craft. Use different shiny handles or glitter, apply mesh (membranes) to the wings, stripes to the tail, make the body shaggy.
6. And add antennae to the insect figurine - make them from thin black threads or from thin paper cuttings. Glue it at the top - to the head.
The charming dragonfly is ready. Using the same principle, you can make a butterfly, only the shape of the wings will need to be modified and made wider. Or come up with some other type of insect, even a fantastic one.
Modular origami for beginners
How to assemble a dragonfly from paper modules
Dragonfly made from paper modules. Master Class
We will tell you how to make a scorpion from paper modules.
This craft can be made by children over 6 years old. This craft is simple and good for those who are just starting to practice the art of origami.
You can make a variety of crafts from paper, including bugs and spiders.
DIY paper dragonfly. Step-by-step production
To make the scorpion, we will use two colors of paper: yellow and brown (the paper can be regular colored, office paper, or special for origami). The size of one module in our case is 7.5 by 5 cm (modules can be made in a different size and color)
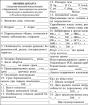
Assemble the yellow, brown and red modules according to the diagram. You will find diagrams for assembling modules.
.jpg)
1. Take 2 brown modules and insert 1 module into the other with the long side facing up.
2. Take 2 more brown modules and connect them in the same way.
.jpg)
3. Connect both pieces of brown modules with three yellow modules. We insert one corner of the yellow module into the empty pockets of the outer modules, leaving the second corners free for attaching the wings.
.jpg)
4. We put on 2 yellow modules in the next row. The extreme corners of the modules of the previous row should be free.
.jpg)
.jpg)
6. In the next row we put on 2 yellow modules, capturing three corners with each of them.
.jpg)
7. We put 1 brown module on the middle corners.
.jpg)
8. Then we put on 2 yellow modules, grabbing the free corners of the previous yellow row.
.jpg)
9. We put 1 red module on the middle corners.
.jpg)
10. Then we put on 2 yellow modules, grabbing the free corners of the previous yellow row.
.jpg)
11. We put 1 red module on the middle corners. We put on 2 yellow modules, grabbing the free corners of the previous yellow row.
.jpg)
12. We put 1 red module on the middle corners. We put on 2 yellow modules, grabbing the free corners of the previous yellow row.
.jpg)
13. We put 1 red module on the middle corners. We put on 2 yellow modules, grabbing the free corners of the previous yellow row.
.jpg)
14. After this, we put one yellow module on all four corners of the previous rows.
.jpg)
15. We put on 1 red module.
.jpg)
.jpg)
17. For the wings, take 40 red modules. Connect 10 modules by inserting one corner of the module into the pocket of another. The second corner remains free.
.jpg)
Make two wings pointing in the same direction and two wings in a mirror image.
.jpg)
18. We put the wings on the free corners located in the upper part of the dragonfly’s body.
.jpg)
19. Take 2 yellow modules and bend them. Screw the left corner on one module, and the right one on the second.
.jpg)
We insert the untwisted corners of the modules (antennae) into the pockets of the brown modules on the dragonfly’s body.
.jpg)
The dragonfly is ready.
.jpg)
Dragonfly. Everyone has their own associations with this cute insect. Some will remember the jumper from the famous fable, while others will remember the warm, hot summer, the river bank, and the dragonflies hovering in the warm air. Mica wings shimmer rainbowly in the sun's rays, warm water whispers about something. And it seems that there is no winter at all, and a joyful, serene eternity has frozen in this blue sky and the graceful, glass-winged beauties living in it.
You can try to bring back a piece of summer on cold winter evenings. You just have to set up the memories. Well, you can complement the atmosphere by creating a piece of the mood yourself. An origami dragonfly will remind you of summer.
Making an origami dragonfly

To create an origami style dragonfly, we will need a paper triangle of the required size. For crafts, it is better to use glossy thick colored paper or colored paper in golden shades.

Fold the triangle in half. The fold line should be perpendicular to the base of the triangle.


Next, we unfold the triangle again, and then form the next fold line, aligning the top of the triangle with the edge and the base. Repeat on both sides. We will need the resulting fold lines for further shaping of the figure.


..
It turns out this is the figure.

We turn the loose ends to the sides, as in the photo above. These are future wings.


The design should look like this. Body and hint of wings.

We unfold the wings and cut them to the bend. We repeat a similar action on the other side.

We bend them, as in the photo above. We repeat the action for both sides.

Spread the wings. We form the dragonfly's head. To do this, bend the protruding part inward and bend the corners outward. The dragonfly is ready.
Paper dragonfly /video/
Origami dragonfly
Easy origami
Conclusion:
The color and size of dragonflies can be any. Well, positive results from making crafts are guaranteed. After all, summer is coming.
Origami dragonfly is one of the most popular paper origami. If you don't know how to make an origami dragonfly, then on this page you will find everything you need to assemble this simple paper figurine.
In the first photo you can see what you will get if you follow the assembly diagram below. The second photo of an origami dragonfly was taken by one of our site users. His dragonfly looks more like a helicopter with four wings. If you have photos of origami you have collected, send them to: This email address is being protected from spambots. You must have JavaScript enabled to view it.

Assembly diagram
Below is a diagram of how to assemble an origami dragonfly from the famous Japanese origami master Fumiaki Shingu. If you strictly follow the instructions, then assembling the origami dragonfly will not take much time, and the result will be the same as in the picture. After doing what is described in the diagram several times, you will understand how to make an origami dragonfly quickly and without looking at the diagram.

Video master class
Assembling an origami dragonfly may seem like a daunting task for beginners. Therefore, we advise you to enter the query “origami dragonfly video” on the largest video hosting site on the Internet, YouTube. There you will find many different videos about origami dragonfly, which clearly show the steps to assemble a dragonfly. We hope that after watching the assembly master class video, you will have no more questions about how to make an origami dragonfly.
Here is a good video on assembling a modular origami dragonfly:
Symbolism
In Japan, dragonflies are held in special esteem. The dragonfly is a symbol of military courage and bravery. Dragonflies were even sacrificed before big battles. It was believed that this would bring good luck and morale to warriors in battle. In China, on the contrary, the dragonfly is a symbol of weakness and instability.
-
 Snowflake made of glass beads. We decorate the Christmas tree. Master class on weaving snowflakes from beads How to weave snowflakes from beads for beginners
-
 A beautiful New Year's sheep craft, created with your own hands, will be a wonderful gift or addition to a gift for a loved one. How to make a sheep from cotton swabs with your own hands
-
 Tie: a stylish accessory or a symbol of slavery?
-
 Rules for epilation of armpits or how to shave armpits correctly Preparatory stage and basic instructions