Vytynanka templates for Valentine's Day. Volumetric protrusions in the shape of a heart: master class and diagrams. Card with roses made of corrugated paper
Vytynaka" (in Ukrainian it is written "vitinanka", and read through "y") - these are openwork ornaments or silhouettes cut out of colored or white paper. Vytynanka is an old folk art of Ukrainians and Slavs in general, but in the Russian language I did not find a separate word, which would describe these “paper laces”...
At least once in our lives, each of us has made a vytynanka - these are the same snowflakes from paper that we cut out as children with our mothers and grandmothers, and then glued them to the windows with soap. Such a small miracle - a couple of cuts with scissors and you unravel amazing patterns...
Well, as a lover of doing all kinds of things with my hands and trying a lot of things, I often return to experiments with paper and scissors. I once gave this vytynanka to my husband for Valentine’s Day:
And although this is not a traditional valentine, there was a place for a heart in this plot - just between the faces of the loving couple
The picture arrived absolutely symmetrical (an ordinary sheet of white writing paper folded in half), and then I made some “gender differences”: I shortened the boy’s hair and slightly reduced his butt, and cut off other “extra details” for the couple. Almost everything was cut out with nail scissors, plus some small ones I made the parts and internal slits with a breadboard knife (it is also called a stationery knife, and is often sold in hardware stores - they use it to cut wallpaper, etc. - this is a knife with a retractable, very sharp blade).
The vytynanka with a couple in love turned out to be very popular - I cut out similar ones again and again, leaving the main plot and changing the details around it. We gave such vytynankas to friends for weddings and girlfriends “for good Feng Shui,” and I even cut out a couple of these for my brother as a gift to his girlfriend... Well, more than once or twice I gave the template to friends, and not only to girls - there were also guys, who were ready to do something with their own hands for their loved ones.
 I’m sharing the scheme and a couple of secrets:
1. - it will expand in a new window in a larger size: you can copy and print it. By bending the sheet in half, you can see that the picture almost symmetrical - it will be clear what is cut out immediately and what is cut off later.
2. Important for beginners! - cut as slowly as possible then the lines will be smooth and there will be no mistakes. 3. Of the entire picture, you can leave only the couple itself, if you don’t have the skill and patience to cut out all these birds and flowers - this option also looks good.
3. White vytynanka looks good on any colored paper. The background can be wallpaper or scrapbooking paper with a non-contrasting pattern.
4. Do not glue the entire protrusion onto the base - the paper may warp from the glue and the appearance will be very sloppy. You can simply place it in a frame under glass without any glue at all, or you can grab it pointwise in two or three places or with a couple of small pieces of thin double-sided tape.
5. What I like best is to design the protrusions in so-called anti-frames - it’s just glass with several clamps and a hinge on plywood and no frame at all. Or framed, but with a wide mat.
Other gift ideas for loved ones -
Oksana Shapkarina,
How to decorate your home in an original way for Valentine's Day? How to create a festive atmosphere and emphasize that a holiday full of love and tenderness, joy and happiness has come to the house? We cut out decorations from paper - and let Her Majesty Love reign!
Cute gifts, cards and valentines are the attributes of Valentine's Day. But if you don’t decorate your apartment or house, the holiday won’t really come. The heart is an organ directly responsible for high and pure feelings. That is why we will take it as a basis for various decorations.
Hang garlands, decorate walls and cabinets, and give your loved ones something you made with your own hands. And when dusk falls, look at the night and admire the tender hearts that decorate the windows. Moreover, in order to decorate and give a touch of coziness, you only need a few hours of free time, plain paper, heart templates for cutting and scissors.
The simplest things become a miracle and give you a festive mood! Don't believe me? Let's check it out together!
Garlands of hearts: using available materials
For such a garland you will need:
- Regular bobbin thread
- Paper cut out hearts
We approach work creatively:
We take a ready-made template of hearts and circles, trace them with a pencil or cut them out immediately, attaching them to colored paper, which will soon become a cheerful and delicate decoration.

And it doesn’t matter at all if there is no paper for creativity in the house. Anything will do for a garland: glossy magazines, unnecessary posters or bright covers that would be a pity to throw away and seem useless to keep in the house.
My colleagues and I created exactly this kind of mobile, swaying with every movement, at work: we cut out hearts and circles from anything, glued the finished templates onto threads in pairs in random order and got this aerial miracle:
 Closer view:
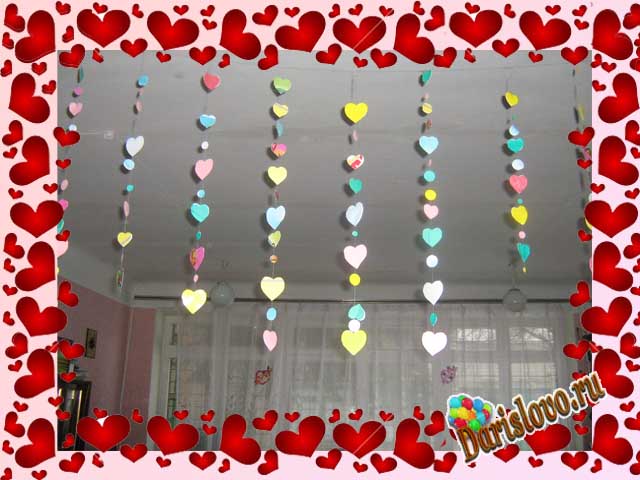
Believe me: it looks original, elegant, and most importantly, you can immediately feel the breath of the coming holiday!
We don’t stop there, we keep creating.
Valentine cards for windows, cabinets or other flat surfaces
For creativity you need:
- Heart templates printed on regular office paper
- Scissors or breadboard knife
- A little time and patience
I cut out the original paper decorations with ordinary nail scissors in my free minutes. The process is leisurely and exciting. It is important to have a firmer hand and more patience. And then you will have these (or maybe completely different) openwork valentines:
The floral motif can be made colored and white, who loves the exquisite simplicity of white
 Couple in love can't get enough of each other
 Three different options for paper hearts
 The whole plot composition
 Daisies are delicate, exquisite, attractive
 And the heart templates themselves for creativity: take them, print them, cut them out.
Hi all! I would like to remind everyone that soon we will celebrate the next holiday called Valentine's Day, which is celebrated every year at the same time on February 14th. What do you think is given in most cases on this day? Of course, small and cool paper valentines that resemble postcards, but only they are made in the shape of hearts and decorated with love and care.
Nowadays, you can easily go to the store and buy such beauty, but still there is nothing more beautiful than making such original pictures and giving them to your loved ones.
Do you know where this holiday came to us from, write your stories below under this note? I think so, so I won’t dwell on this question, but will immediately start with the most important and basic, teach you and show you step by step different ideas for crafts for Valentine’s Day, so let’s get started.
Of course, you can knit such creations, or even sew them; I recently saw how a heart was made from beads and even felt. By the way, for those who are interested in felt toys, I suggest you take a look at this
It’s no secret to anyone that even a child can make paper products, because such material is in every home; the main thing in this matter is to approach it competently and do everything as the author recommends. Therefore, watch these step-by-step instructions and repeat, the result will be simply stunning and very beautiful.
I suggest making the first option for two halves at once, for example, a husband and wife, and hanging such a decoration above the bed.
We will need:
- paper
- paints
- ribbon
- scissors
Stages of work:
1. As you can see, everything is quite easy and quick, dip your fingers in the paint, that is, apply it to the surface of your palms, and then make a print that will resemble a heart symbol.
2. Cut with decorative scissors and thread ribbon through.

The next way to make a Valentine card from what you have, so to speak from scrap materials, is to take cardboard, preferably pink or red, plus colored paper. You will also need glue, a pencil and scissors.
We will need:
- red colored cardboard - 1 sheet
- sheet of pink colored paper - 1 pc.
- pencil
- scissors
Stages of work:
1. Everything is extremely simple: fold a sheet of cardboard in half and cut out a heart, then from pink colored paper you have to make thin strips, which you cut as if you were making grass or something similar, twist each strip on a pencil.

2. Glue flowers onto the layout and you can optionally decorate it with sparkles and something else to your taste. The result is a slightly voluminous and at the same time elegant craft, which you can happily give to your mother or sister and tell them how much you love them.

And a similar idea that also captivated me also uses interlacing strips of paper:

But that's not all, if you use your imagination, you can come up with your own patterns, because there is nothing difficult here, see what can happen. Well, if you think that you can’t handle it, then contact me and I will send you stencils that you can use to make these lovely creations.

I really liked these views, there are stencils in enlarged form. By the way, such crafts are called intertwined paper hearts.

The simplest thing is that you can do this and decorate this ordinary heart with any decorations, letters, rhinestones, etc.

Master class on paper valentines for children
Undoubtedly, in schools today there is still such a tradition as setting up mailboxes and throwing anonymous wishes in there, which everyone then receives. You will agree that this is so cool and tempting that it makes this holiday unique for everyone.
Therefore, most schoolchildren, and just preschool children, love to create magnificent cards, and then give them to all those whom they love and adore.
Therefore, if you have children, then you can easily give them such a gift.
For children in kindergarten and at home, by the way, you can use this type of work as a group to make such a drawing, crumple a heart shape from ordinary toilet paper containers, and then dip it in paint and fill the entire Whatman paper. Even a 2-3 year old child can cope with this task.
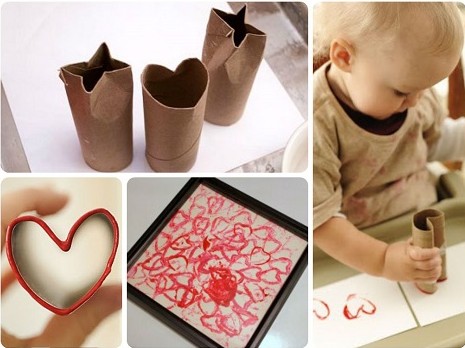
And if you still haven’t learned how to draw a heart, then you can use this stencil.

After all, children can simply decorate it with felt-tip pens or pencils and draw their own patterns, or use nothing else. Anti-stress drawing, or as it is called coloring.

You can find various ideas if you want a bunch of such anti-stress products, of course this work will be more addressed to high school and schoolchildren. I have several coloring books in my piggy bank, if you are interested, write to me.

Or make a bookmark for this topic, cut out the hearts from paper yourself, and the child should glue them on as an example, but something like this.

You can also make origami, because such an activity will certainly delight the kids. Make a boat with them, and instead of a sail, a symbol of lovers on a stick.


Original postcard Heart for February 14th with a diagram
While I was preparing for this article, I found several ways to beautifully and unexpectedly surprise your loved one. After all, on this day you really want something that will make your head spin. For example, if your betrothed gives you a ring, but not just like that, but in your purse. It will look dignified and at the same time romantic.
You will need to cut out two figures like this from paper using ordinary sharp scissors:
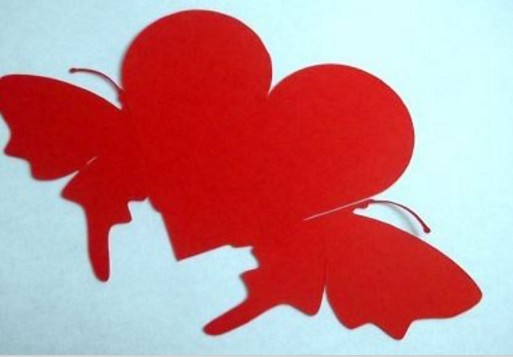
And then connect them together, but in advance you will need to fold them in half, where you see symmetry, make a small cut where the antennae of the butterfly are.
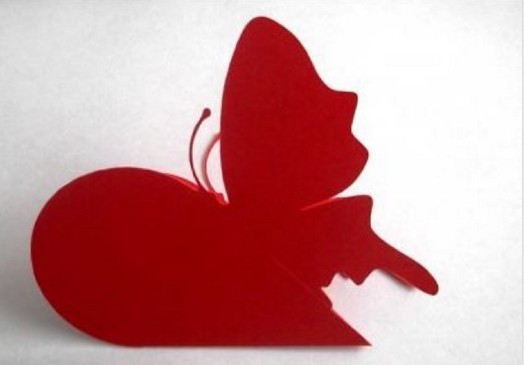
You'll get something like this:

Now all that remains is to glue a ribbon or make it out of paper and insert a treasured gift with wishes or a banknote.

I can offer a more complicated craft, for those who are familiar with the technique of cutting out stencils, it will be easy for them, this is a method of poking with a special knife, as people say vytynanka. You can get the stencil itself completely free of charge, if you write a comment below, I will definitely send it to you.

You can also whip up such a masterpiece using your palms. I think that the process of making such a product is already clear.


It looks gentle and of course with love. Your loved one will definitely be happy and smile and give you a kiss.

In America and other countries, they very often give their loved ones paintings related to this topic, you can use newspapers, you don’t need to be an artist to create such work, see for yourself.

Well, another type is vytynanki, they are also appropriate to use here. And I will write more about them below. To be honest, such a souvenir can be taken to a competition in a kindergarten or school.

Here is its template, cut it out using a cutter or a special sharp knife.

Making voluminous valentines at home
As for such large and seemingly voluminous figurines for this holiday, I suggest first taking the easiest route and making a heart outline out of cardboard, and then using woolen threads, you can take different colors, or you can take a single color. Tie, that is, wrap, as shown in this photo.

In the first version, we made flowers and glued them to the workpiece, you can also do it in this case.

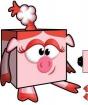
You can also easily and quickly cut out this ready-made pattern, and then glue the sides and the box together.

And then decorate it with all kinds of decorations, such as scrapbooking kits. I found a similar option in this video, I’m sharing it with you:
While I was writing this note, one idea came to my mind, and it came to me for a reason, my eldest son was sitting and putting together a mosaic of puzzles, so that’s what I came up with. How do you like what you saw?

Video on how to make a craft for Valentine's Day
Make such a romantic card in the form of your hands, everything will be clear without words.
Or do something more interesting:
Volumetric valentine in origami style
There are a lot of crafts on the Internet on the theme of Valentine's Day, especially using such a famous technique as origami, you can create hundreds of different patterns.
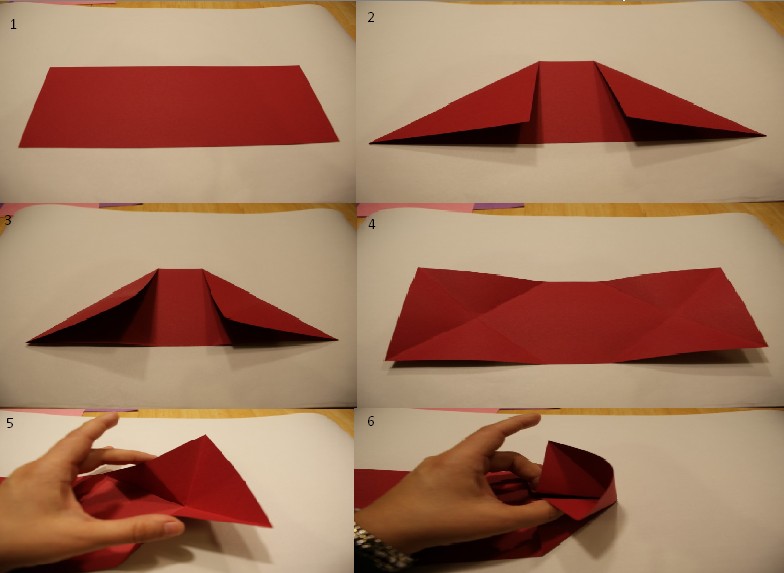
You can make an origami heart yourself using this step-by-step diagram, follow it and you will succeed. After all, it looks truly beautiful and original.

The steps are simple as always, you just need to fold the paper correctly.

And then the result will not be long in coming, first practice folding these lovely valentines on plain white paper, and then move on to colored paper.

Or use something like this.

You can also bake a very tasty one, and then stick special toppers on sticks into it. To do this, you just have to cut out hearts from paper, and then fold them like an accordion and glue them onto a stick.

Catch these templates, you can copy them and then easily print them yourself on a printer.

3D hearts are very popular now, you can also make them if you watch this video from YouTube:
You can request a stencil for this video from me below in the comments, I will definitely send it to you.
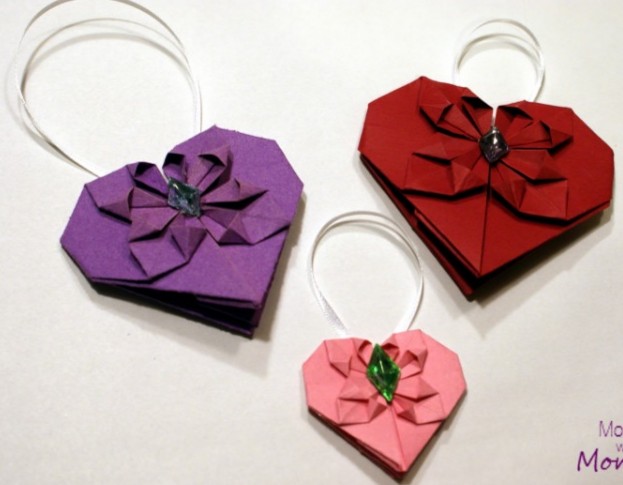
And also very original and super cool origami hearts with flowers, which I really liked.

Do you know how these are made? Now I will show you instructions with which you can make this wonderful thing.
Repeat the entire sequence, the main thing is to take your time and be careful.

Then everything will certainly work out.
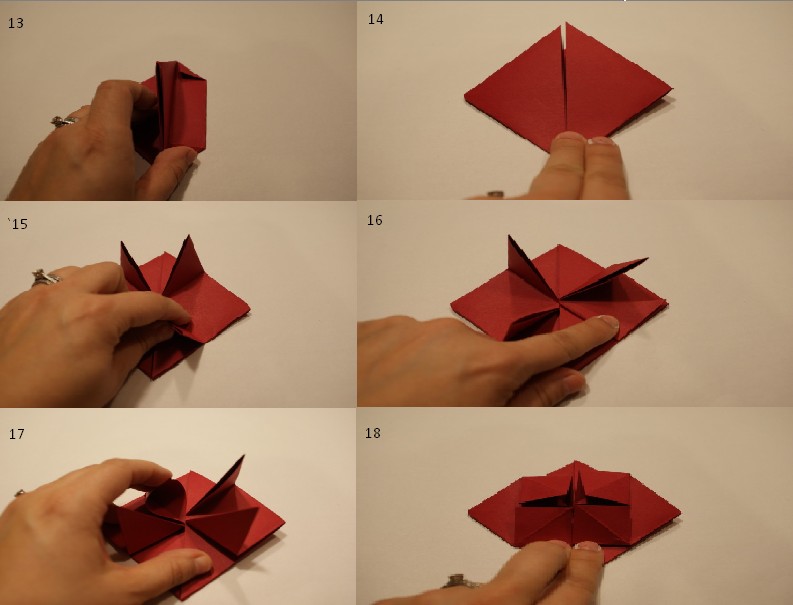
Happened? Then proceed to the next steps))).

Glue the rhinestone and make a handle. Voila, beauty.
Heart made using quilling technique
Do you know what this unique and at first glance interesting word, quilling, means? In fact, it’s a very funny technique that helps you fold paper into little funny things. I think all those who love creativity and crafts are familiar with this type of work or have you ever seen such cute souvenirs.
If you know how to use and make such valentines, please share your work with us, I can only offer you these ideas that I liked myself.

I suggest you make a photo frame and something else, take a look and decide for yourself what is closer to your soul.
Or make this small but nice thing from strips:

We will need:

Stages of work:
Take a ready-made heart template or make it manually using a compass or something round. Then attach the stencil to thick cardboard and cut out the blank. Next, place the blank on colored paper and make some more reserve, as shown in the figure.

Glue on this green cover. Then cut out a heart from red colored paper and glue it to the back of the piece. On this side you can write a love note or poem.
Then make quilling figures, roll strips of paper onto a pencil, use a special ruler and a toothpick.

When you get the puck, leave it in the circle of that same engineering ruler.
Take your love photo and trace it to the shape you want, then stick it on with double-sided tape or tape.
Now all that remains is to glue all the elements. And that’s how wonderful and magical it looks.

And you can also make a red pendant, a symbol of love.
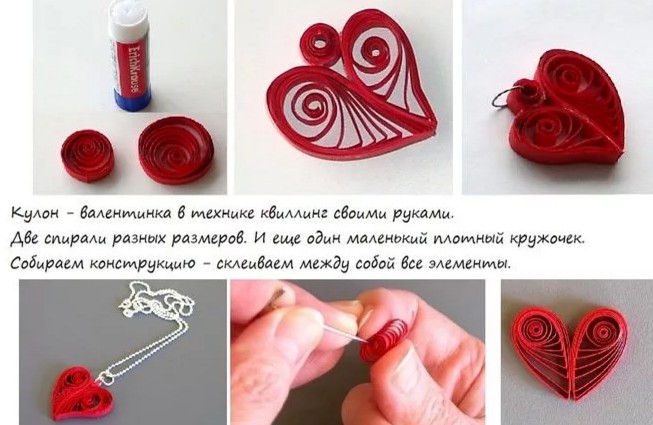
Card with roses made of corrugated paper
Well, now I offer another fairly common option of roses, which are easy to twist if you take the right type of paper, we are talking about corrugated paper.

There is also a great idea for a very large valentine, which is made in the style of topiary, it looks great, at first glance you might think that such a charming invention is beyond your power, but in fact, believe me, your eyes are afraid, but your hands do.

Now you will see the necessary basics and based on this information you can easily build such a thing. Moreover, it can be given not only for Valentine’s Day, but also for March 8 or a birthday.
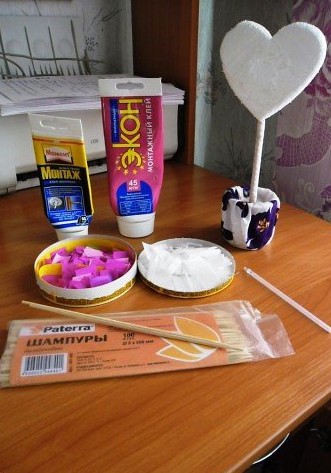
Stages of work:
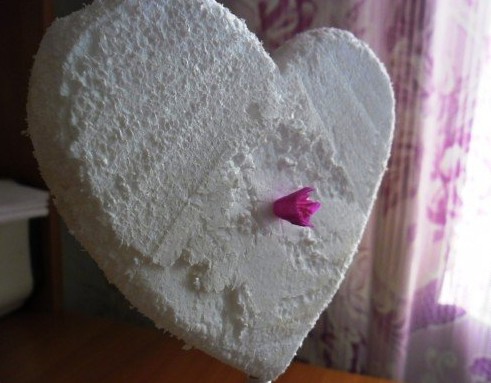
1. Take regular polystyrene foam and cut out a symbol of love from it; the thickness should be approximately 3 cm.

2. Next, take a stick or pencil; barbecue sticks are very suitable for this purpose and stick it into the heart. Hide the stick using a decorative ribbon. After that, insert the stick into the jar, it also needs to be decorated, wrap the dishes with cloth or paper, in general, with improvised means, you can even use plasticine.
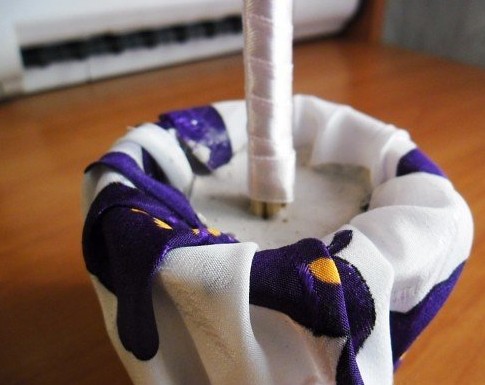
To prevent the stick from falling in the pot, fill everything with plaster.
3. Now prepare the following materials for work, this is glue, it is better to take something like liquid nails, they are more convenient to work with. Then you will need corrugated or crepe paper and a gel pen refill.
4. Now do the facing. The word is difficult at first glance, but nothing is difficult.
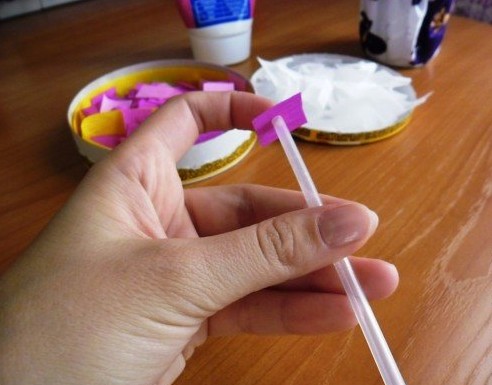
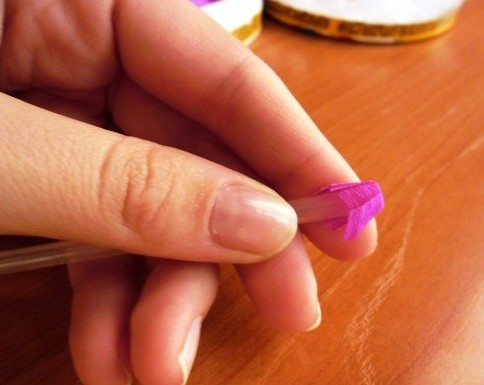
5. Stick the rod into the middle of the rectangle (cut the paper into small pieces of the same size) and then crumple it up.
6. Now aim straight at the heart, glue the blank to the foam.
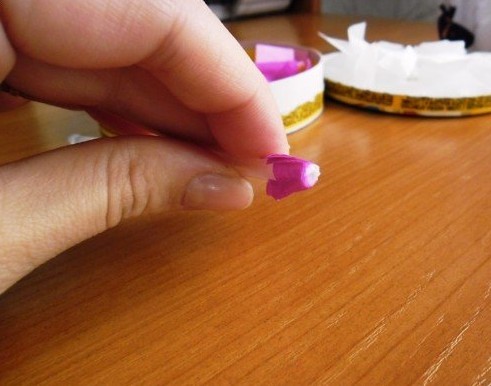
Remember that it is better to apply glue to the paper blank itself.
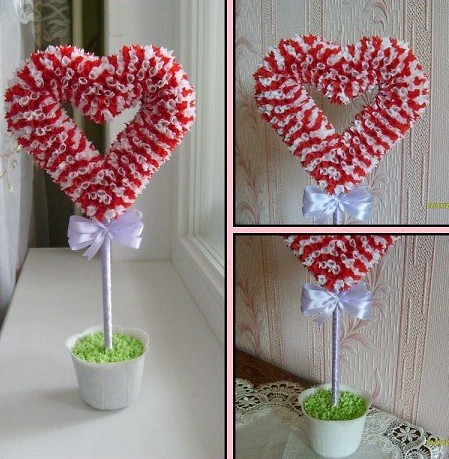
Using this cutting method, you can also make such a fluffy and voluminous card on cardboard.

Pictures and templates for printing
So we’ve reached the very last option, it will be unexpected, but also pleasant at the same time. In one magazine I saw such a cool new product for interior design and home decor.
I remember that when the New Year came, many of you asked me to send them templates for the window, so why not implement it here too, decorate the window for February 14th with the necessary symbols, these could be hearts, angels, doves, etc. How do you look at this, see how you can do it in an original way.


I really like this embodiment, and write your suggestions and reviews))).

And I honestly really liked these images of a girl and a boy. And you? There is also a diagram of Cupid and a fairy, as in the photo on the window. In my piggy bank there is a boy and a girl kissing in a heart and much more.

Therefore, if you also want to decorate your apartment with your children, then you can request all the diagrams and templates completely free of charge; as always, I will send them to everyone by email.
Well, for those who didn’t like such a creation, I give you small blanks that you can also print on a printer and give to your beloved family and friends.


This is how the selection turned out, I hope my finds will be useful to someone. Have a good day everyone, good mood and positivity! Bye!
Sincerely, Ekaterina Mantsurova
Here is an easy and interesting master class on how to make an opening heart-shaped box with your own hands and decorate it with carved ornaments using the punching technique. Such a box will be an ideal handmade Valentine's card, because inside it can fit a love message, candy or a small gift. However, such voluminous hearts can be useful for a variety of reasons. For example, turn into an invitation to a birthday, wedding or party, or become a spectacular surprise package for any occasion.
Necessary materials
- cardboard with a density of 180-300 g. (regular Whatman paper or business card),
- sheet of scrap paper 30 x 30 cm for decoration,
- PVA glue,
- knife with replaceable blades,
- pencil,
- eraser.
That's all the simple materials we will need in the process of making a valentine.
Making a blank
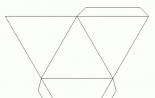
To make voluminous hearts, we can use any bonbonniere patterns that we like. For example, here are the following diagrams:
Source: http://firstwedding.ru/
Print out the sheet with the diagram. If you don’t have a printer, you can simply put a sheet of white paper on the monitor and trace the diagram with a pencil, everything will be perfectly visible. Cut out the template.

Using the template, we transfer the valentine card diagrams onto the selected cardboard. We cut out the workpiece with a breadboard knife, crease all the dotted places using a knitting needle or a creasing stick.
Valentine's decor
Now it's time to decorate our hearts until they are glued into a bonbonniere. I offer you three different decorating methods to choose from.
Openwork box
The easiest way to decorate hearts using the punching technique is to cut through all four halves with an openwork pattern. You can come up with and draw any of your own drawings or use my options.
In order for the box not to lose its structural rigidity, I retreat from the edge of each quarter by only half a centimeter, this is quite enough.

Important! In order for the ornament to be symmetrical on all parts of the product, you must first draw and cut it on the template, and then transfer the template to the box itself.

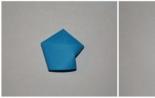
Scrappaper
An easy and quick decor option. We take our paper template, step back half a centimeter from the edge of one of the quarters and cut out the middle in the shape of a drop like this.
 Place a drop on a sheet of scrap paper and make four blanks.
We tint the edges of the droplets with stamp paint.  Glue the parts into place on the box.
This is how beautiful the result is!

Mix of both options
Another way to decorate hearts is to cut out a carved ornament from scrap paper and glue it to the bonbonniere blank. This is what came out of it for me.
 Each of these options is good in its own way. Which one is better is up to you to choose! Here are all four of my Valentines together.
 I hope my master class will be useful to you and will help you quickly prepare for any holiday! Using the same technique, you can decorate any other boxes, the diagrams of which can be viewed in.
I wish you good gifts, and may the creative mood remain with you all 365 days a year!